Lab 04 - GPS
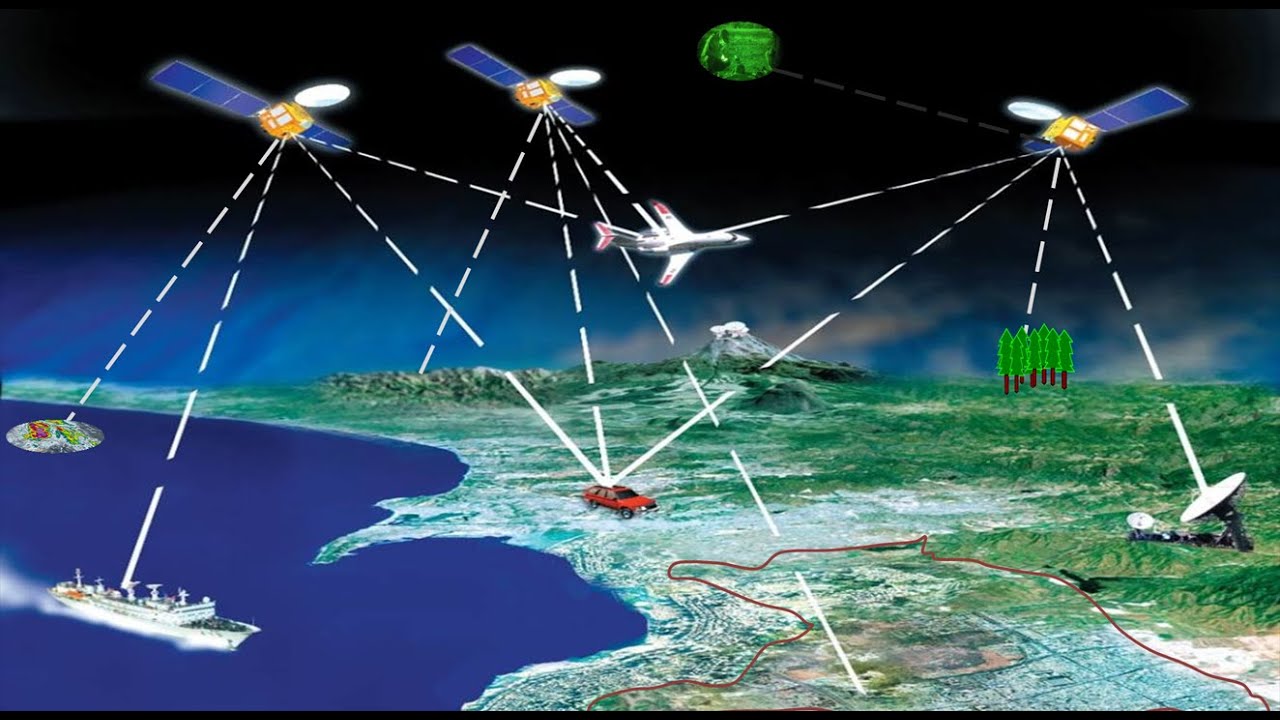
This exercise provides an introduction to using a Global Positioning System (GPS) receiver to obtain coordinates and create a point shapefile. GPS is a system consisting of a network of satellites that orbit ~11,000 nautical miles from the earth in six different orbital paths. They are continuously monitored by ground stations located worldwide. The satellites transmit signals that can be detected with a GPS receiver. Using the receiver, you can determine your location with great precision through the trilateration (not triangulation!) of signals from at least 3 satellites, getting a distance from the difference between time measurements.
Although the system is very sophisticated, and atomic clocks are used by the satellites, there are multiple sources and types of errors involved in finding your location. As the GPS signal passes through the charged particles of the ionosphere and then through the water vapor in the troposphere, this causes the signal to slow a bit, and this creates the same kind of error as bad clocks. Also, if the satellites that are in your view at a particular moment are close together in the sky, the intersecting circles that define a position will cross at very shallow angles. That increases the error margin around a position. The kind of GPS receivers we will be using provide about 10 meter accuracy (which may be reduced to under 3 m if differential corrections like WAAS are used), depending on the number of satellites available and the geometry of those satellites.
In this exercise we are going to collect the coordinates of some set of campus features using either the GPS units or your phones, generate a few shapefiles of those features, and then use the shapefile to make a map. The goals for you to take away from this lab:
- How to use your selected platform to collect data
- How to export that data
- How to view that data in GIS software
Outline:
For this lab you are submitting a map (read: not a screenshot) of the GPS features you create in the field. Submit the created .jpg to blackboard.
If you have an Android phone, I highly recommend the Android specific application, it is by far the most robust data collection application I’ve tested, and you will always have your phone on hand. The Apple/cross platform application will work for the objectives and purposes of this lab, but you will likely be underwhelmed by the capabilities. The handheld units are the most traditional (and perhaps most powerful) options, but unless you go out and buy a GPS unit for yourself you will likely never hold a GPS unit in your hands again.
The apps outlined in this lab are all free to use, although many have the option of upgrading to a paid version. You do not need to pay for anything if you don’t want to.
If in the event you get confused as to what your looking at, spamming the back button should always take you to the main menus.
Note: Make sure your unit is charged before going out on your adventure!
Your goal in this lab is to demonstrate to me that you can collect the three different types of data: points, lines, and polygons. How you go about demonstrating that is up to you. Perhaps you want to go out and collect bus stops, a bus path, and outline the building? You can also go collect tree locations, water paths, and outline grassy areas? Maybe you want to go sample all the coffee on campus and trace your path from your dorm to the class? Whatever you decide to do, go out and collect these data and then view them in Google Earth to make a very simple map.
Use the following instructions, your intuition as an individual born in the digital age, and trial and error to collect data for the above mission.

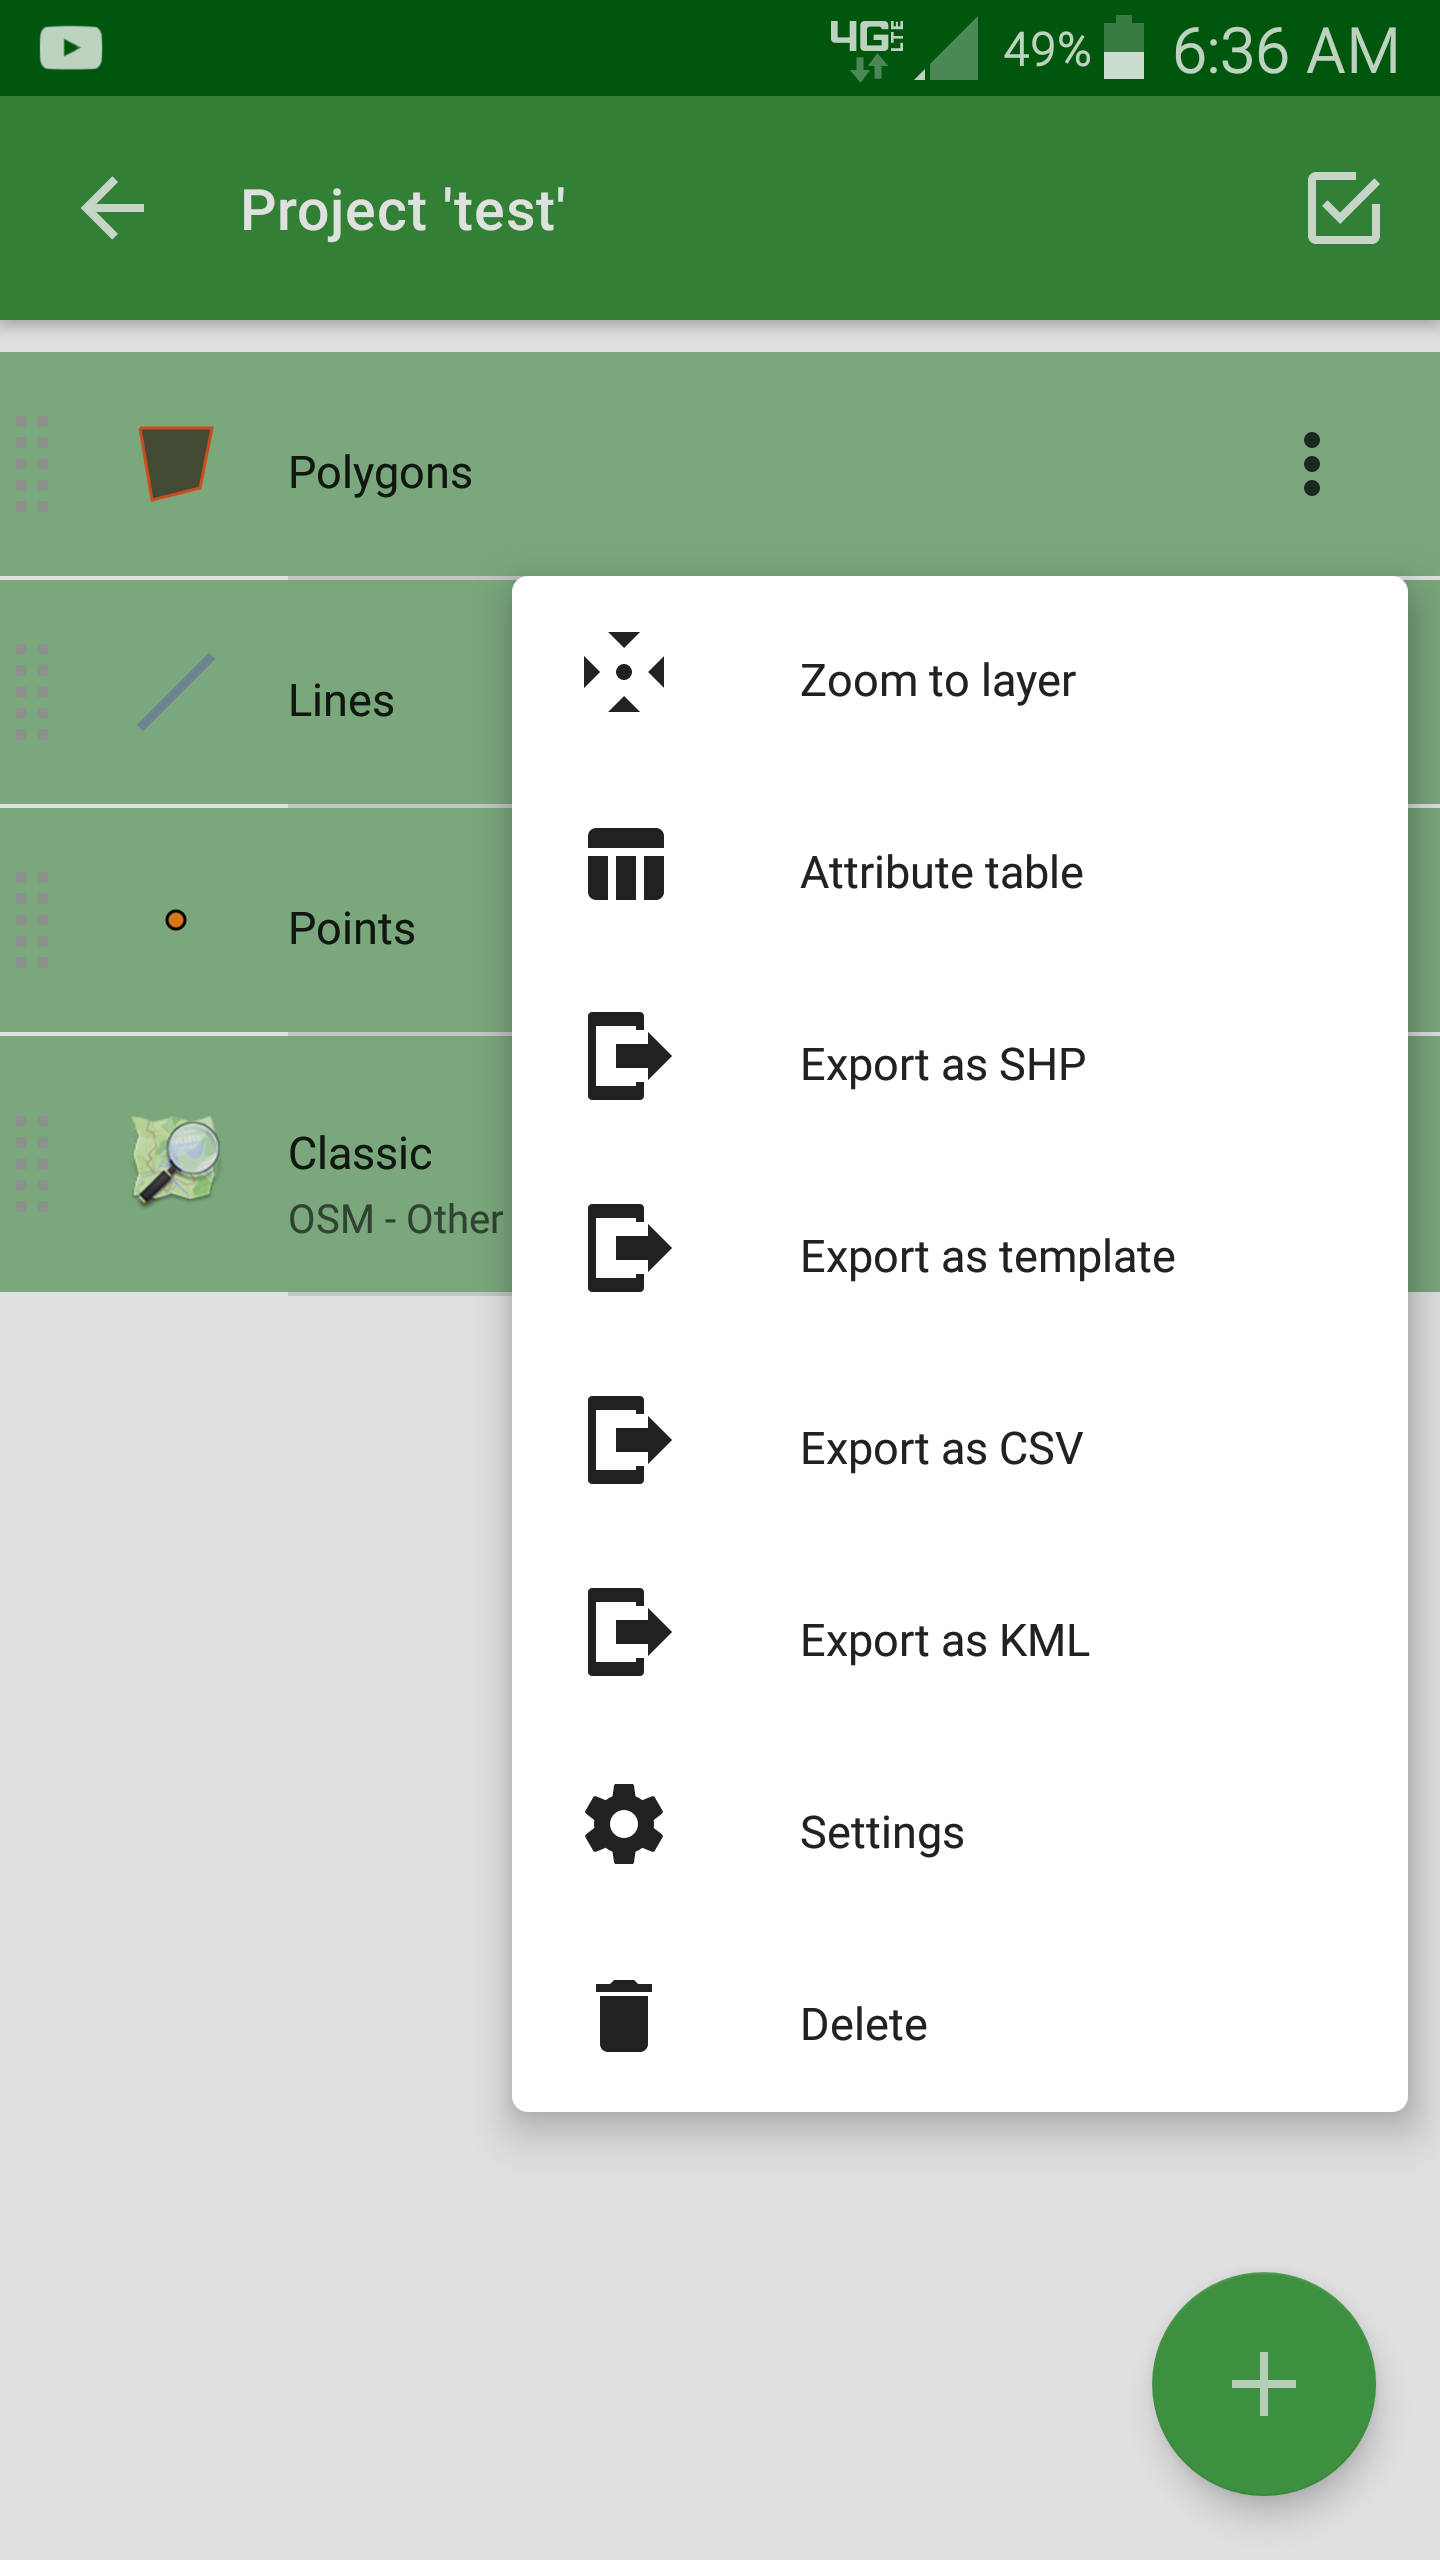
If you are on an android device there are a few options available to you. The one you will need for this lab is called Locus GIS. The advantages of this app (Locus) over the cross platform one is several-fold. Perhaps most critically, the app allows you to export databases of features at once without going through a paywall. This app also seems to forgo ads when collecting data. The forms to add data are also more robust, allowing you to add attributes and pictures to the feature. I also feel the interface is easier to use.
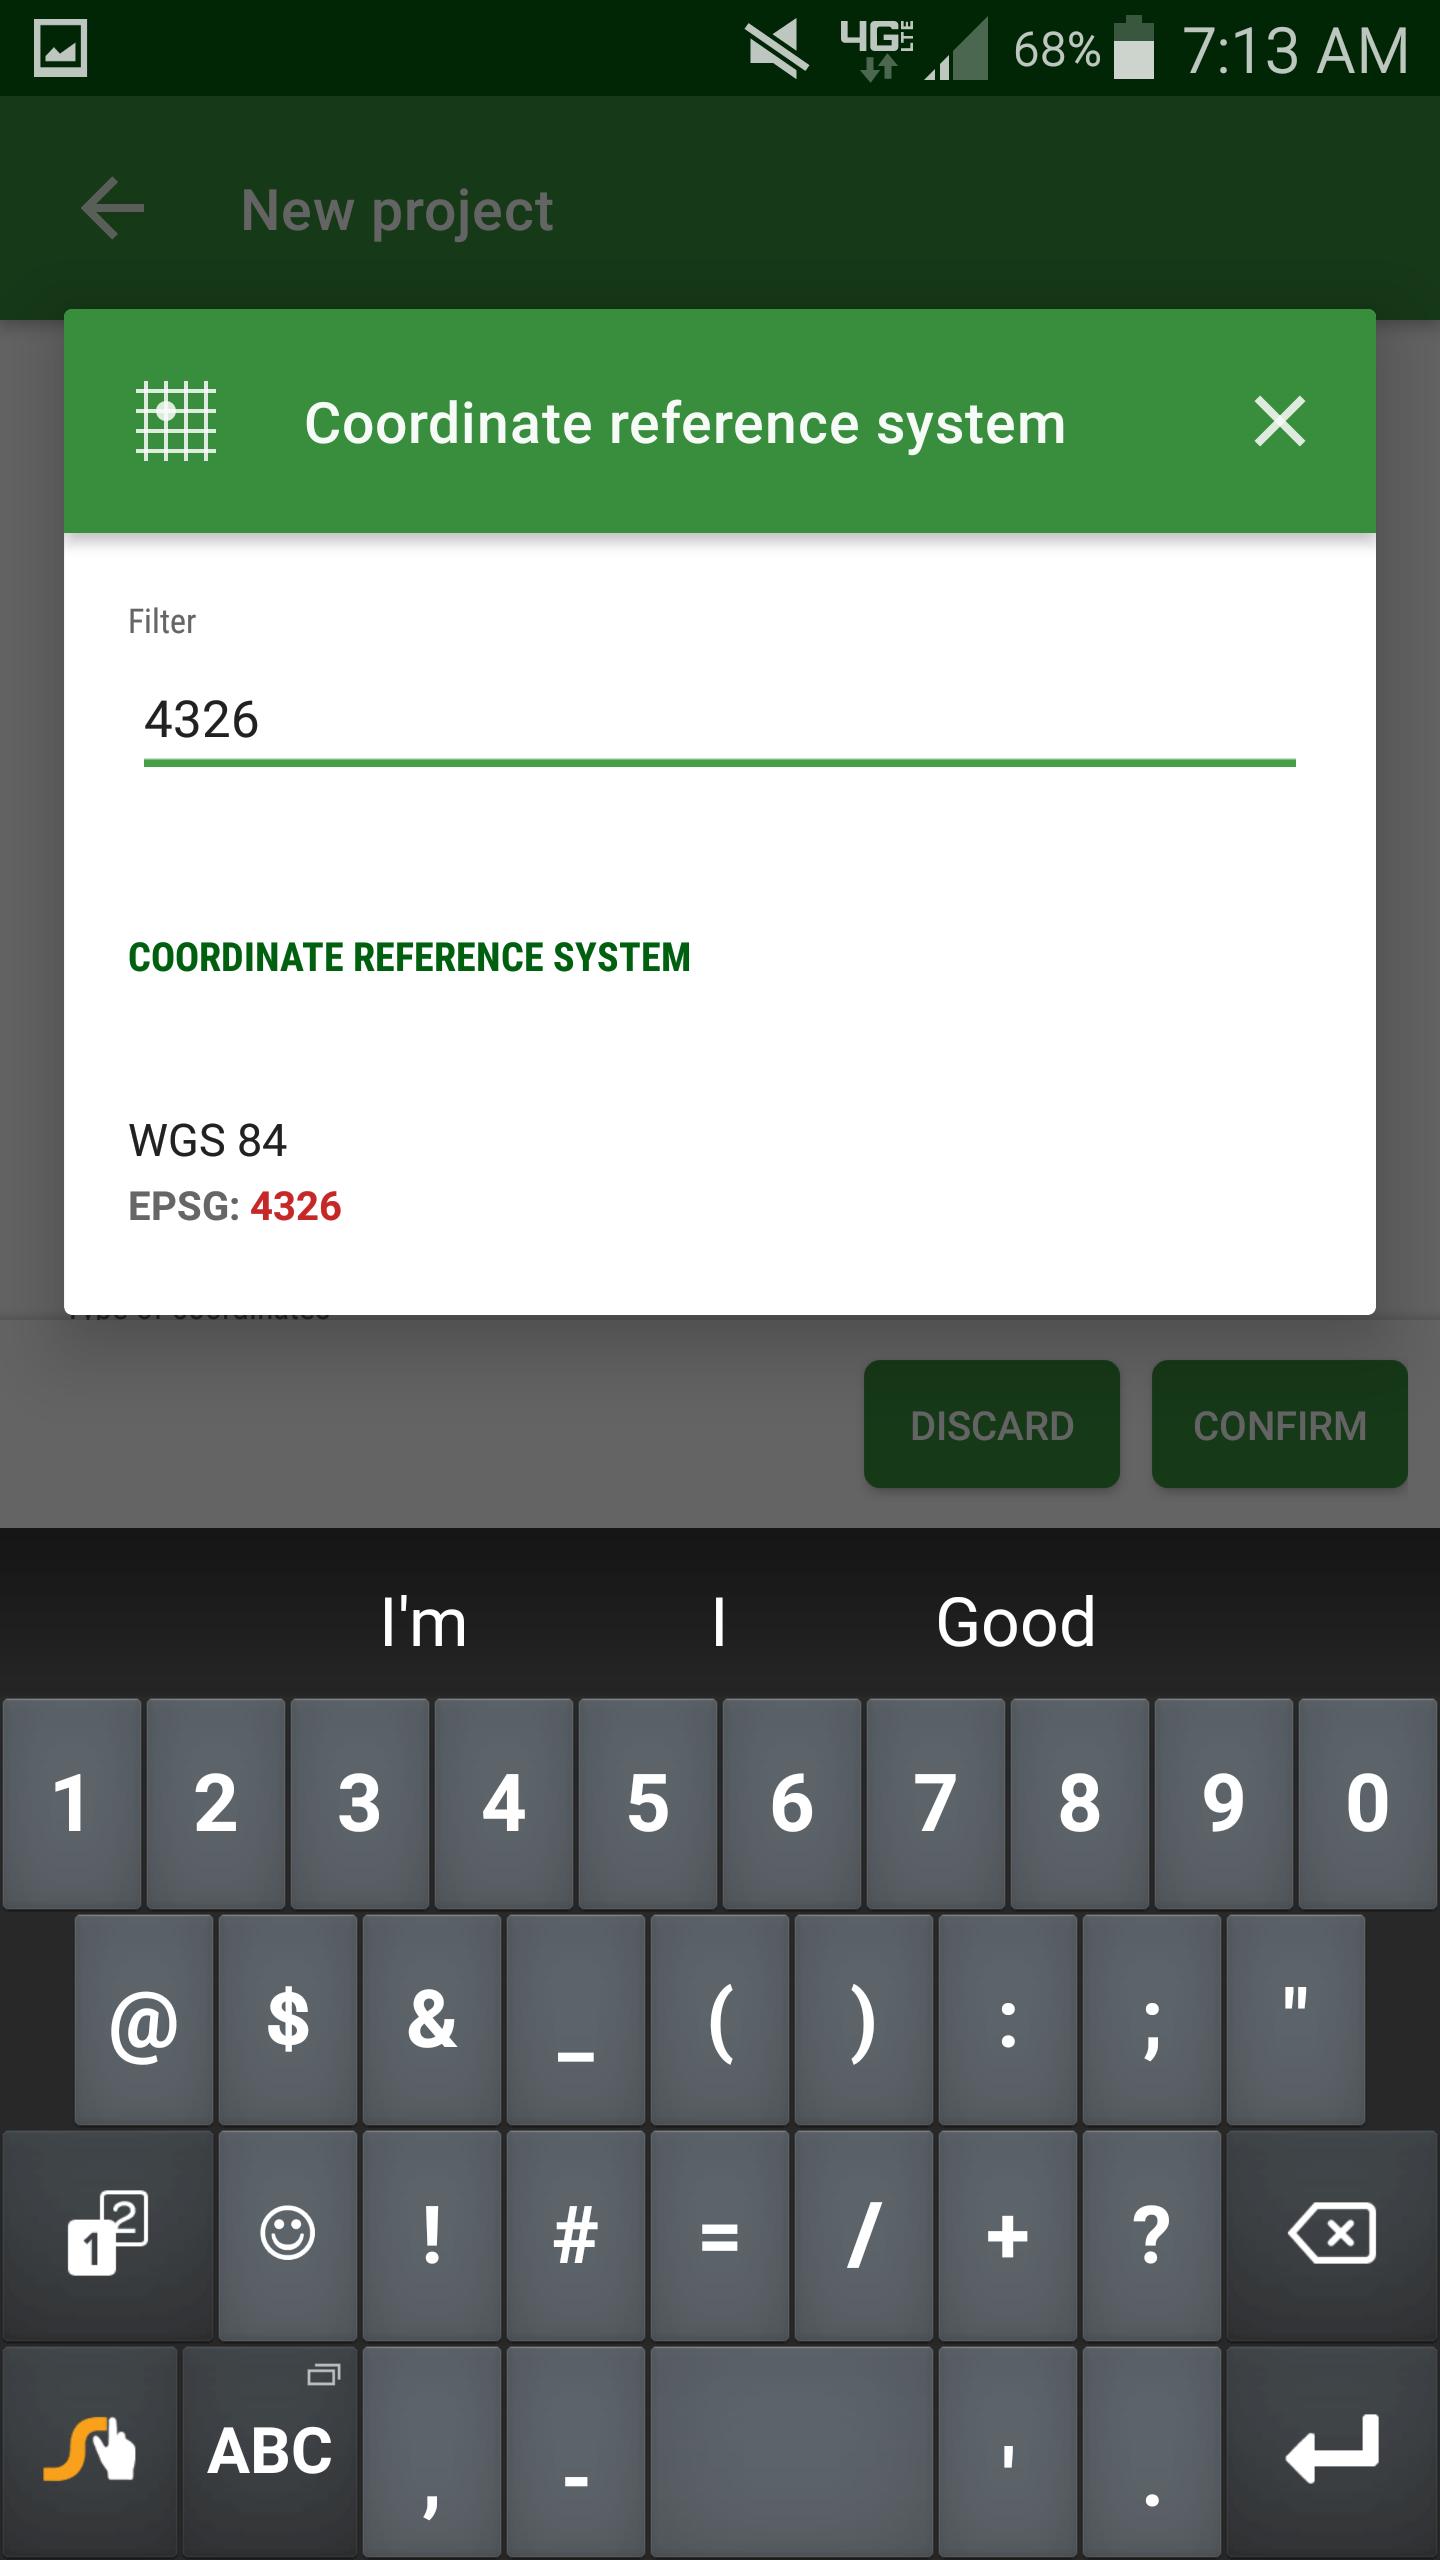
LOCUS separates data by projects, so to start a new project, go to the menu and create a new project. Make sure your new project coordinate system is set to 4326.
To go to a particular point, first add the point using the plus button, and manually enter the coordinates. After the point has been added, you can click on it, and at the top of the application, one of the options will be to navigate to the point using Google Maps.
Locus allows you to record points based on GPS, but also has a rich digital editor that allows you to draw GIS data. We’ll only cover recording data here, but feel free to explore!
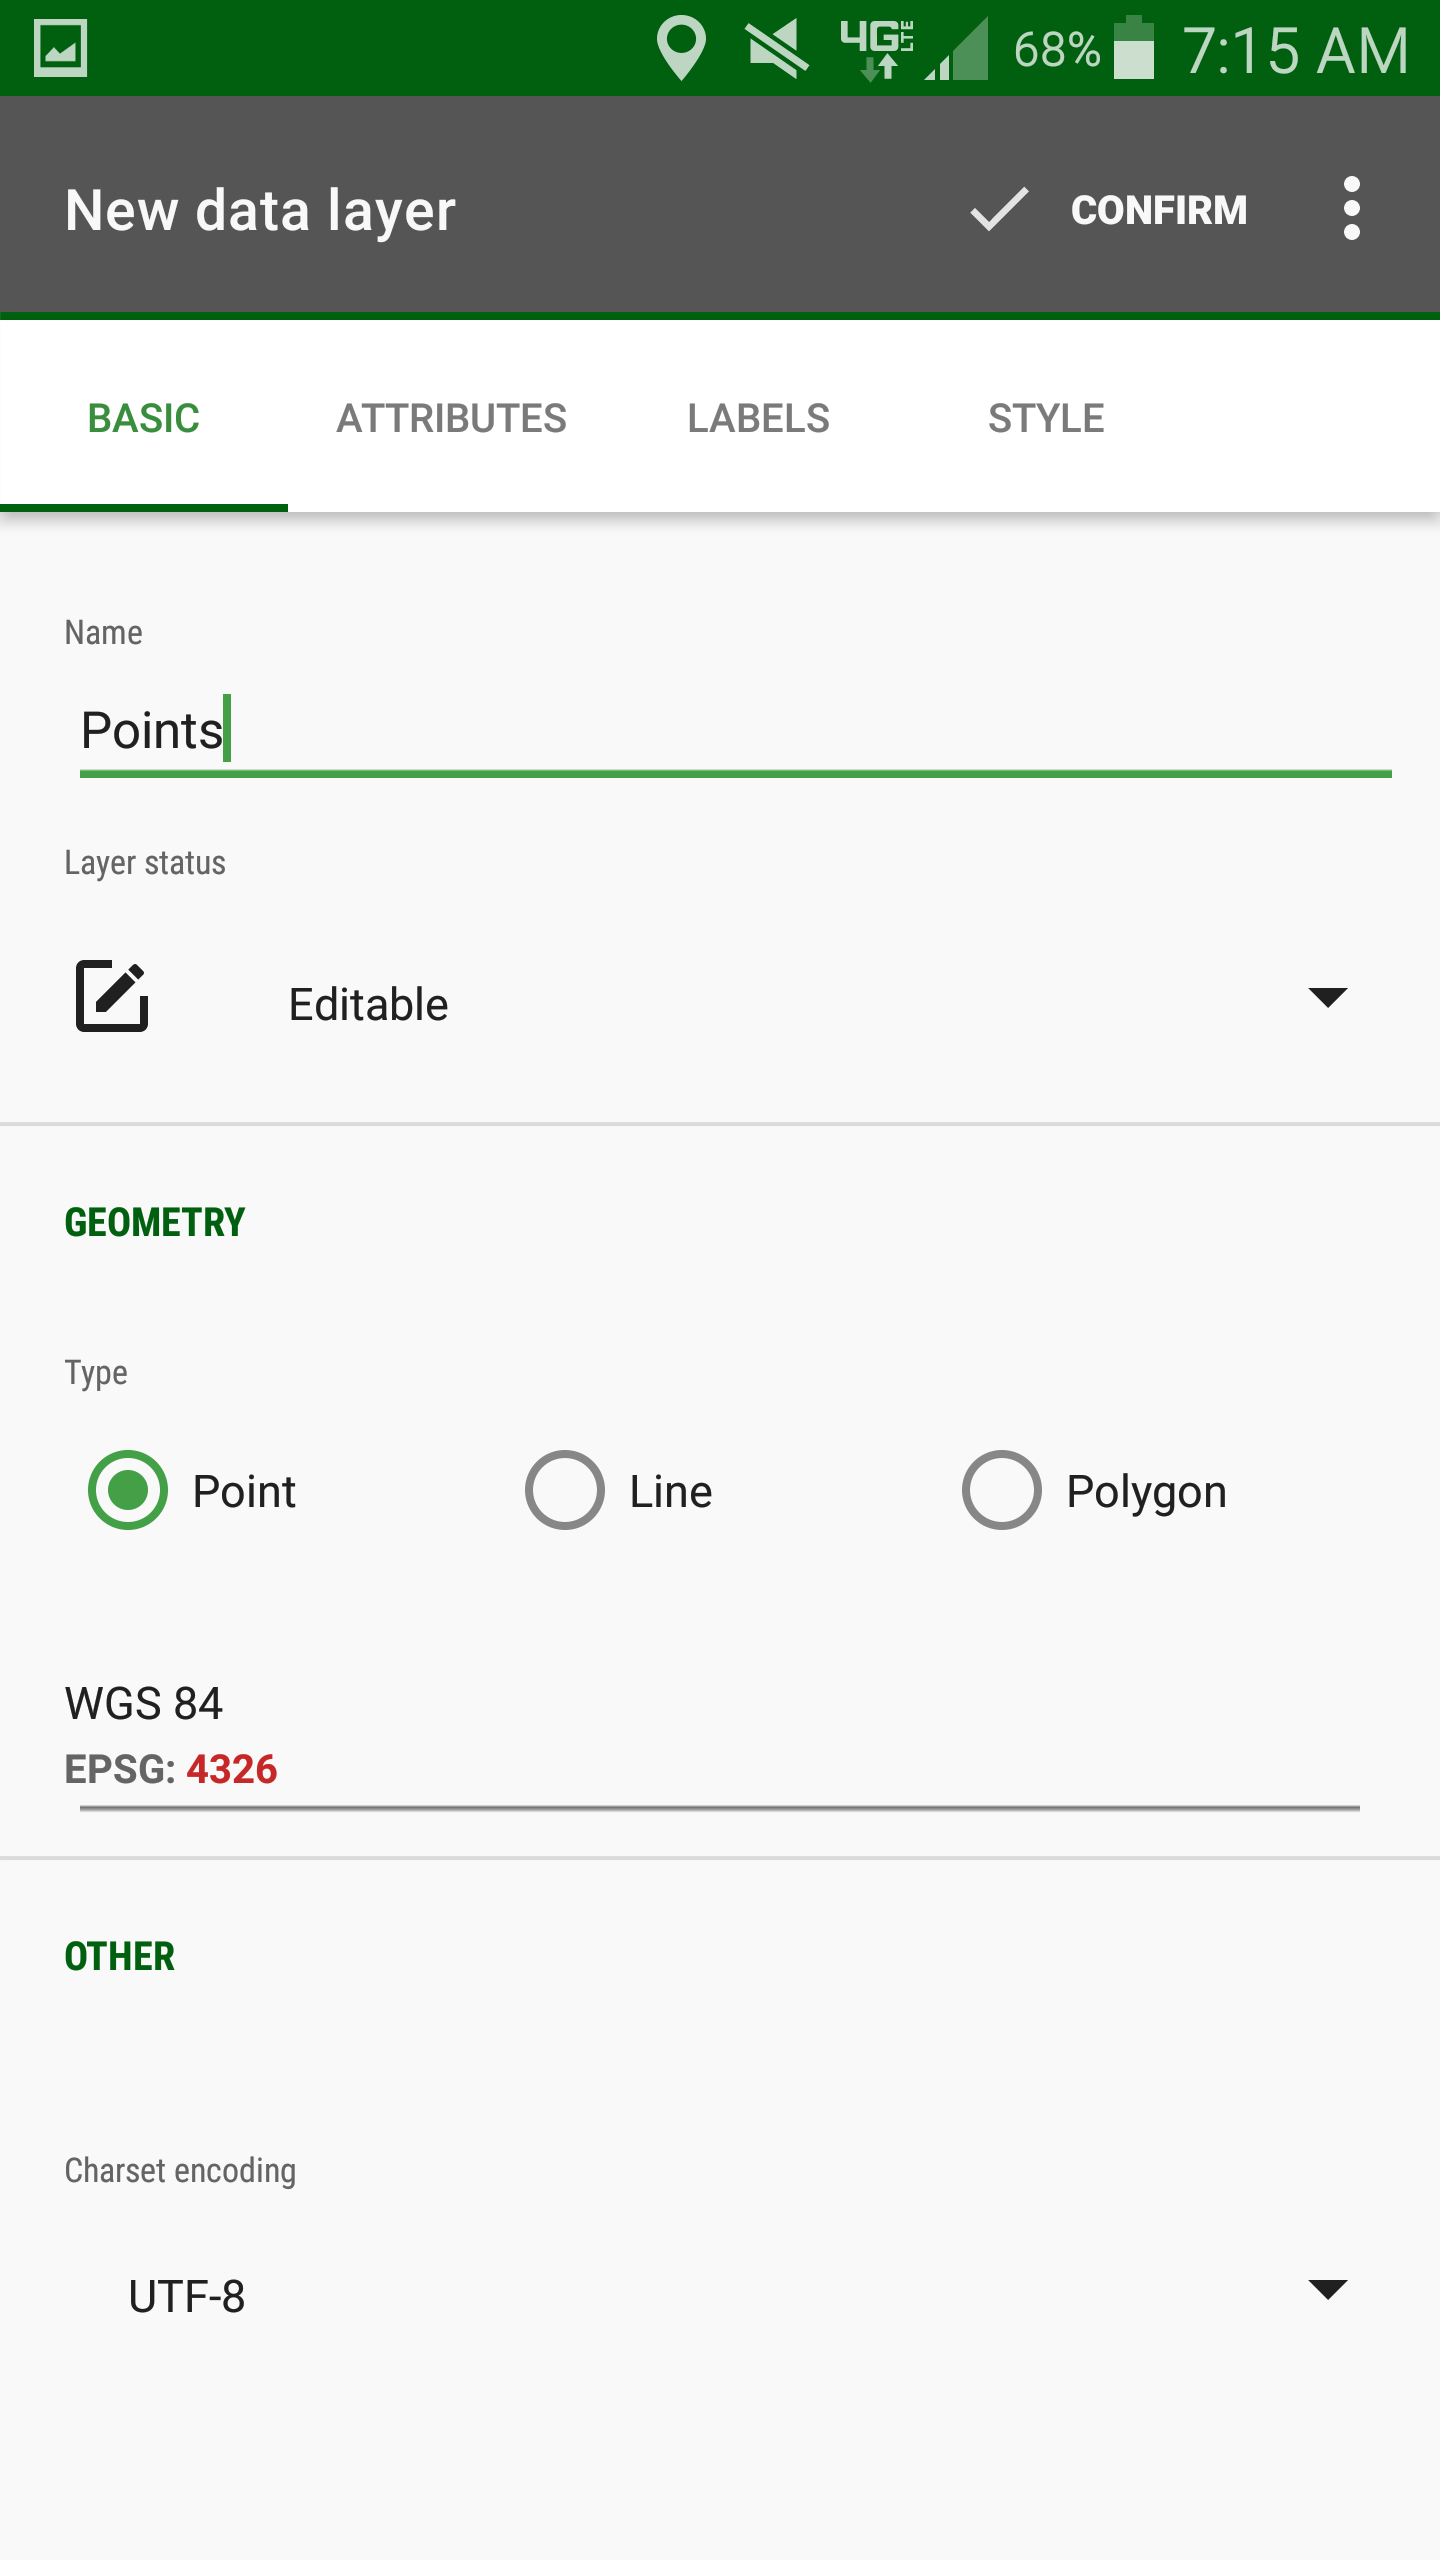
To create points, you need to first create a point file and fill out the fields as necessary. These can be edited in app.
You likewise need to create new files for lines and polygons. To draw a line, start recording and stop or pause recording when you want to stop.

You are looking for the Fields Area Measure Free app. There is a guided tutorial built right into the app, and your intuitive knowledge as digital generation should carry you the rest of the way.

- Click the menu button (upper left corner), and go to saved measures. Click the three buttons next to the entries to delete them.
- To set the units, go to settings, and make sure the measurement system is set to metric
- To go to a particular point, first add the point using the plus button, and manually enter the coordinates. After the point has been added, you can click on it, and at the top of the application, one of the options will be to navigate to the point using Google Maps.
There are a few caveats to this app. First, you may have to sit though an ad if you drop more than a few features in a session. Finally, the exporting of the data must be done individually (feature by feature), making the unpaid version of this unworkable for larger projects. Sorry apple :(
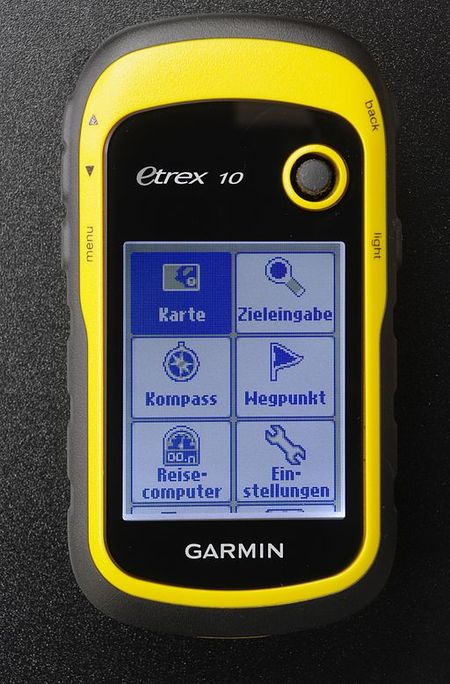
The lab has access to the eTrex handheld garmin units. See the website for the users manual. Instructions on how to accomplish some of the most common tasks are included below:
First, lets make sure the unit is set up properly.
- From the main menu, go to setup | units and ensure distance is set to metric and elevation is in feet
- from the setup menu, go to Position Format and make sure it’s set to hddd.ddddd°, Map Datum and Map Spheroid are both set to WGS 84
- Finally, from setup go to reset and make sure that you delete all waypoints and clear the current track
- To go to a point, from the main menu go to where to | coordinates, and enter your coordinates, or choose a previously dropped waypoint.
- When done, the map will pop up, directing you to your chosen destination.
From the main menu, go to Mark waypoint and click done
Lines:
- Go to Main Menu | Tracks
- To begin line: Clear | Yes (clear track log) | Track Log on
- To end line: Track Log off | Save | Yes (save all tracks)
- Make sure you clear the track log between tracks! (This keeps each line separate.)
Polygons:
- Use the same steps as lines, except you need to make sure that your line ends where it began.
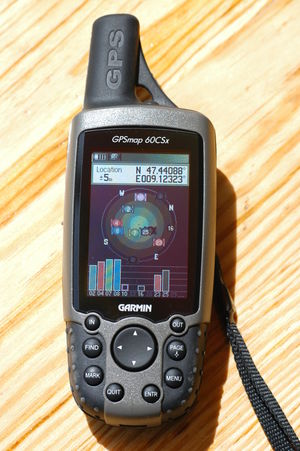
The lab also has Garmin GPSMap 60CS handheld units. See the website for the users manual. Instructions on how to accomplish some of the most common tasks are included below:
Note: Charge the unit with the provided usb cable before going out on your adventure!
- Make sure the GPS unit is configured to collect coordinates in decimal degrees and distance is in meters:
- Main Menu (press Menu twice) | Setup | Units | Position format = hddd.ddddd° | Distance/Speed = Metric
- Even though the map datum will be set to WGS 84, this will correlate fine with the NAD projection of our data later on.
Next, lets clear out the old data.
- Find | Waypoints | Menu | Delete… | All Symbols | Yes
- Main Menu | Tracks | Clear | Yes | Menu | Delete All Saved | Yes
Points:
- Press the Mark button. Click OK to save.
- To view a list of all of the waypoints you have taken, use the Find button (it leads to Waypoints menu) next to the Mark button.
Lines:
- Go to Main Menu | Tracks
- To begin line: Clear | Yes (clear track log) | Track Log on
- To end line: Track Log off | Save | Yes (save all tracks)
- Make sure you clear the track log between tracks! (This keeps each line separate.)
Polygons:
- Use the same steps as lines, except you need to make sure that your line ends where it began.
Each method of acquiring GPS data can come with it’s own headache of data massaging. Our goal is getting the data off of the device and into the KML/KMZ format. Fortunately for us, all of the above methods of data collection facilitate this format natively, so we don’t have to do a weird data conversion dance to arrive at our desired endpoint. Use the following instructions to export your data.
As mentioned, LOCUS makes this process painless, from your project simply click the 3 more buttons and then Export as KML.
- Click the Start/Windows button, click the little down arrow in the bottom left corner, and then click dnrgps (under #-Programs).
Note: you can also download from the Minnesota Department of Natural Resources. However, apparently ftp is on the way out and it can be difficult to get it to download properly. I’ve saved a version here for archival purposes, but to get this to download for yourself (I’m assuming you are using Chrome) you need to:
- Type “chrome://flags” into the browser bar
- ctrl-f “ftp” to find the relevant flag
- enable and refresh the browser
- Attempt to redownload it,
- On the bottom download bar, an unsecure warning appears. click the arrow and then Keep to finally retrieve the file
- Connect the GPS unit to the computer using the provided USB cable. Turn the unit on, press the Page button until you reach the Satellite screen, press the Menu button and select Use with GPS off (this helps save the battery).
- If the application doesn’t find your GPS unit automatically, select GPS | Find GPS (or Connect to Default GPS).
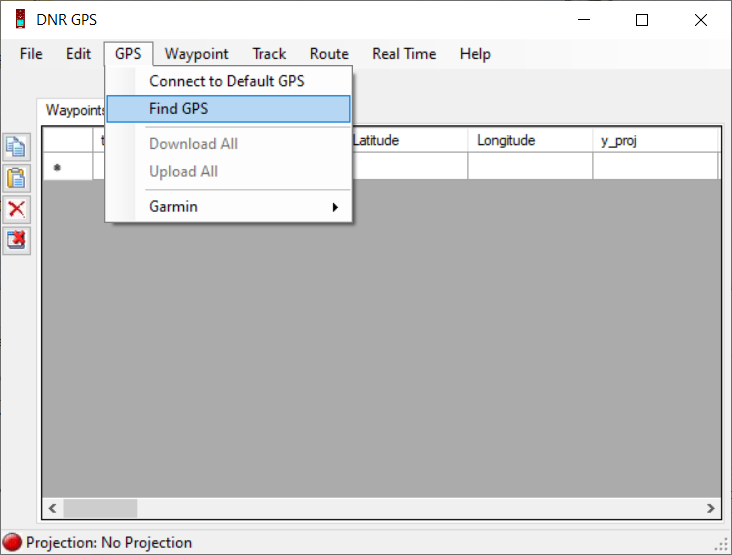
- Download your features into the application by clicking the GPS menu and selecting Download All.
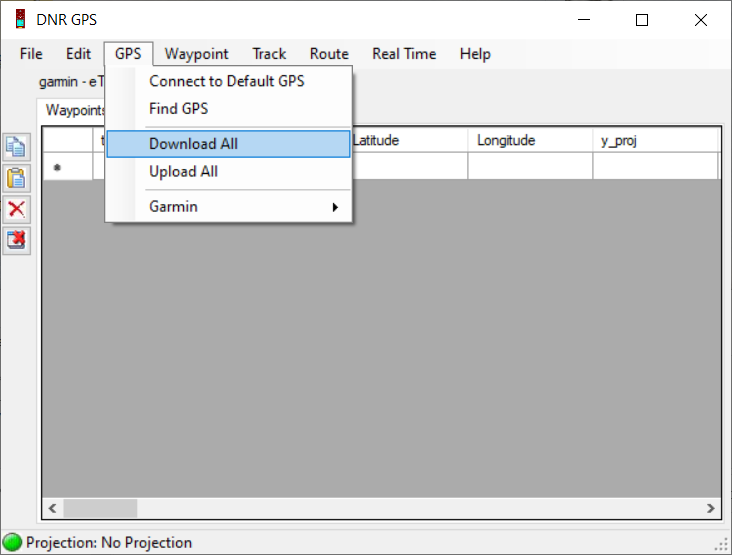
- Look at the table of waypoints. If you see any unwanted waypoints in the table, select them and click the red X on the left side of the screen.
- Let’s project our data before we go any further. Click File > Set Projection. On the Projection tab, set the POSC Code to “26915”, the datum to “NAD83”, and the projection to “UTM zone 15N” (or whatever is appropriate for your use case). When finished, click OK.
- Select all of the waypoints that you want to use and then click Edit > *Project Coordinates.
- Click File > Save To > File…. Save your waypoints as a KML with a sensible naming convention (like “GEOG111_Lab4Waypoints”).
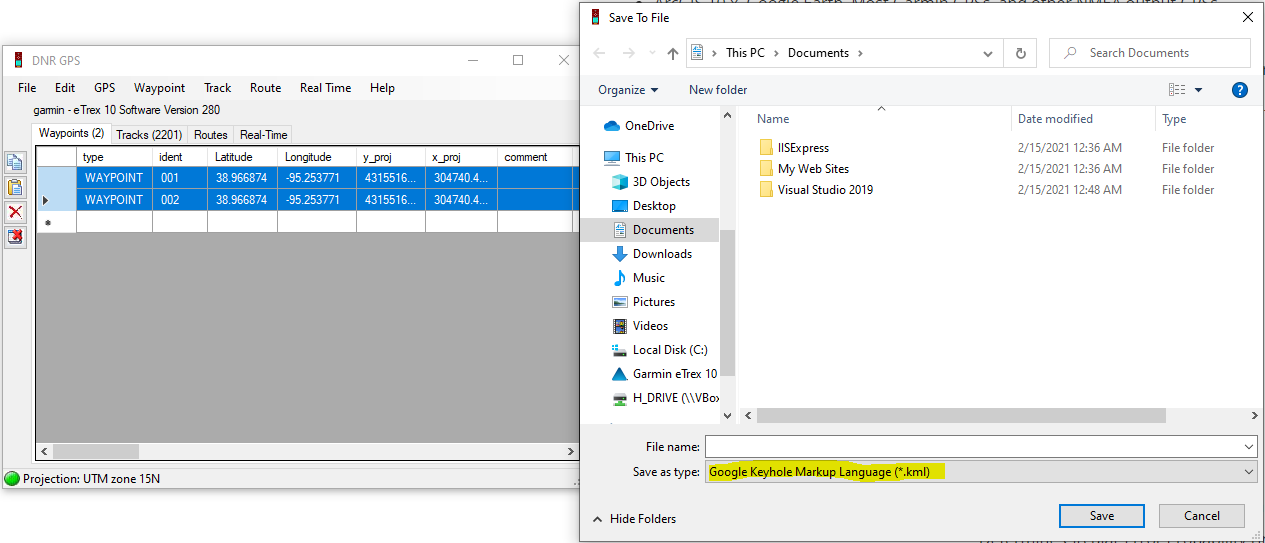
- Downloading tracks is similar to downloading waypoints. Click the Tracks tab and then select all the records (rows) that correspond to your tracks click File > Save To > File…. Save your track as KMZ with a sensible name. When it prompts for Save to Shape/GPS Types, be sure you select the appropriate one. When in doubt, Line is safest.
- When you’re done creating your KML’s, close the DNR GPS application, turn the GPS unit off, disconnect the unit from your computer, and put it back.
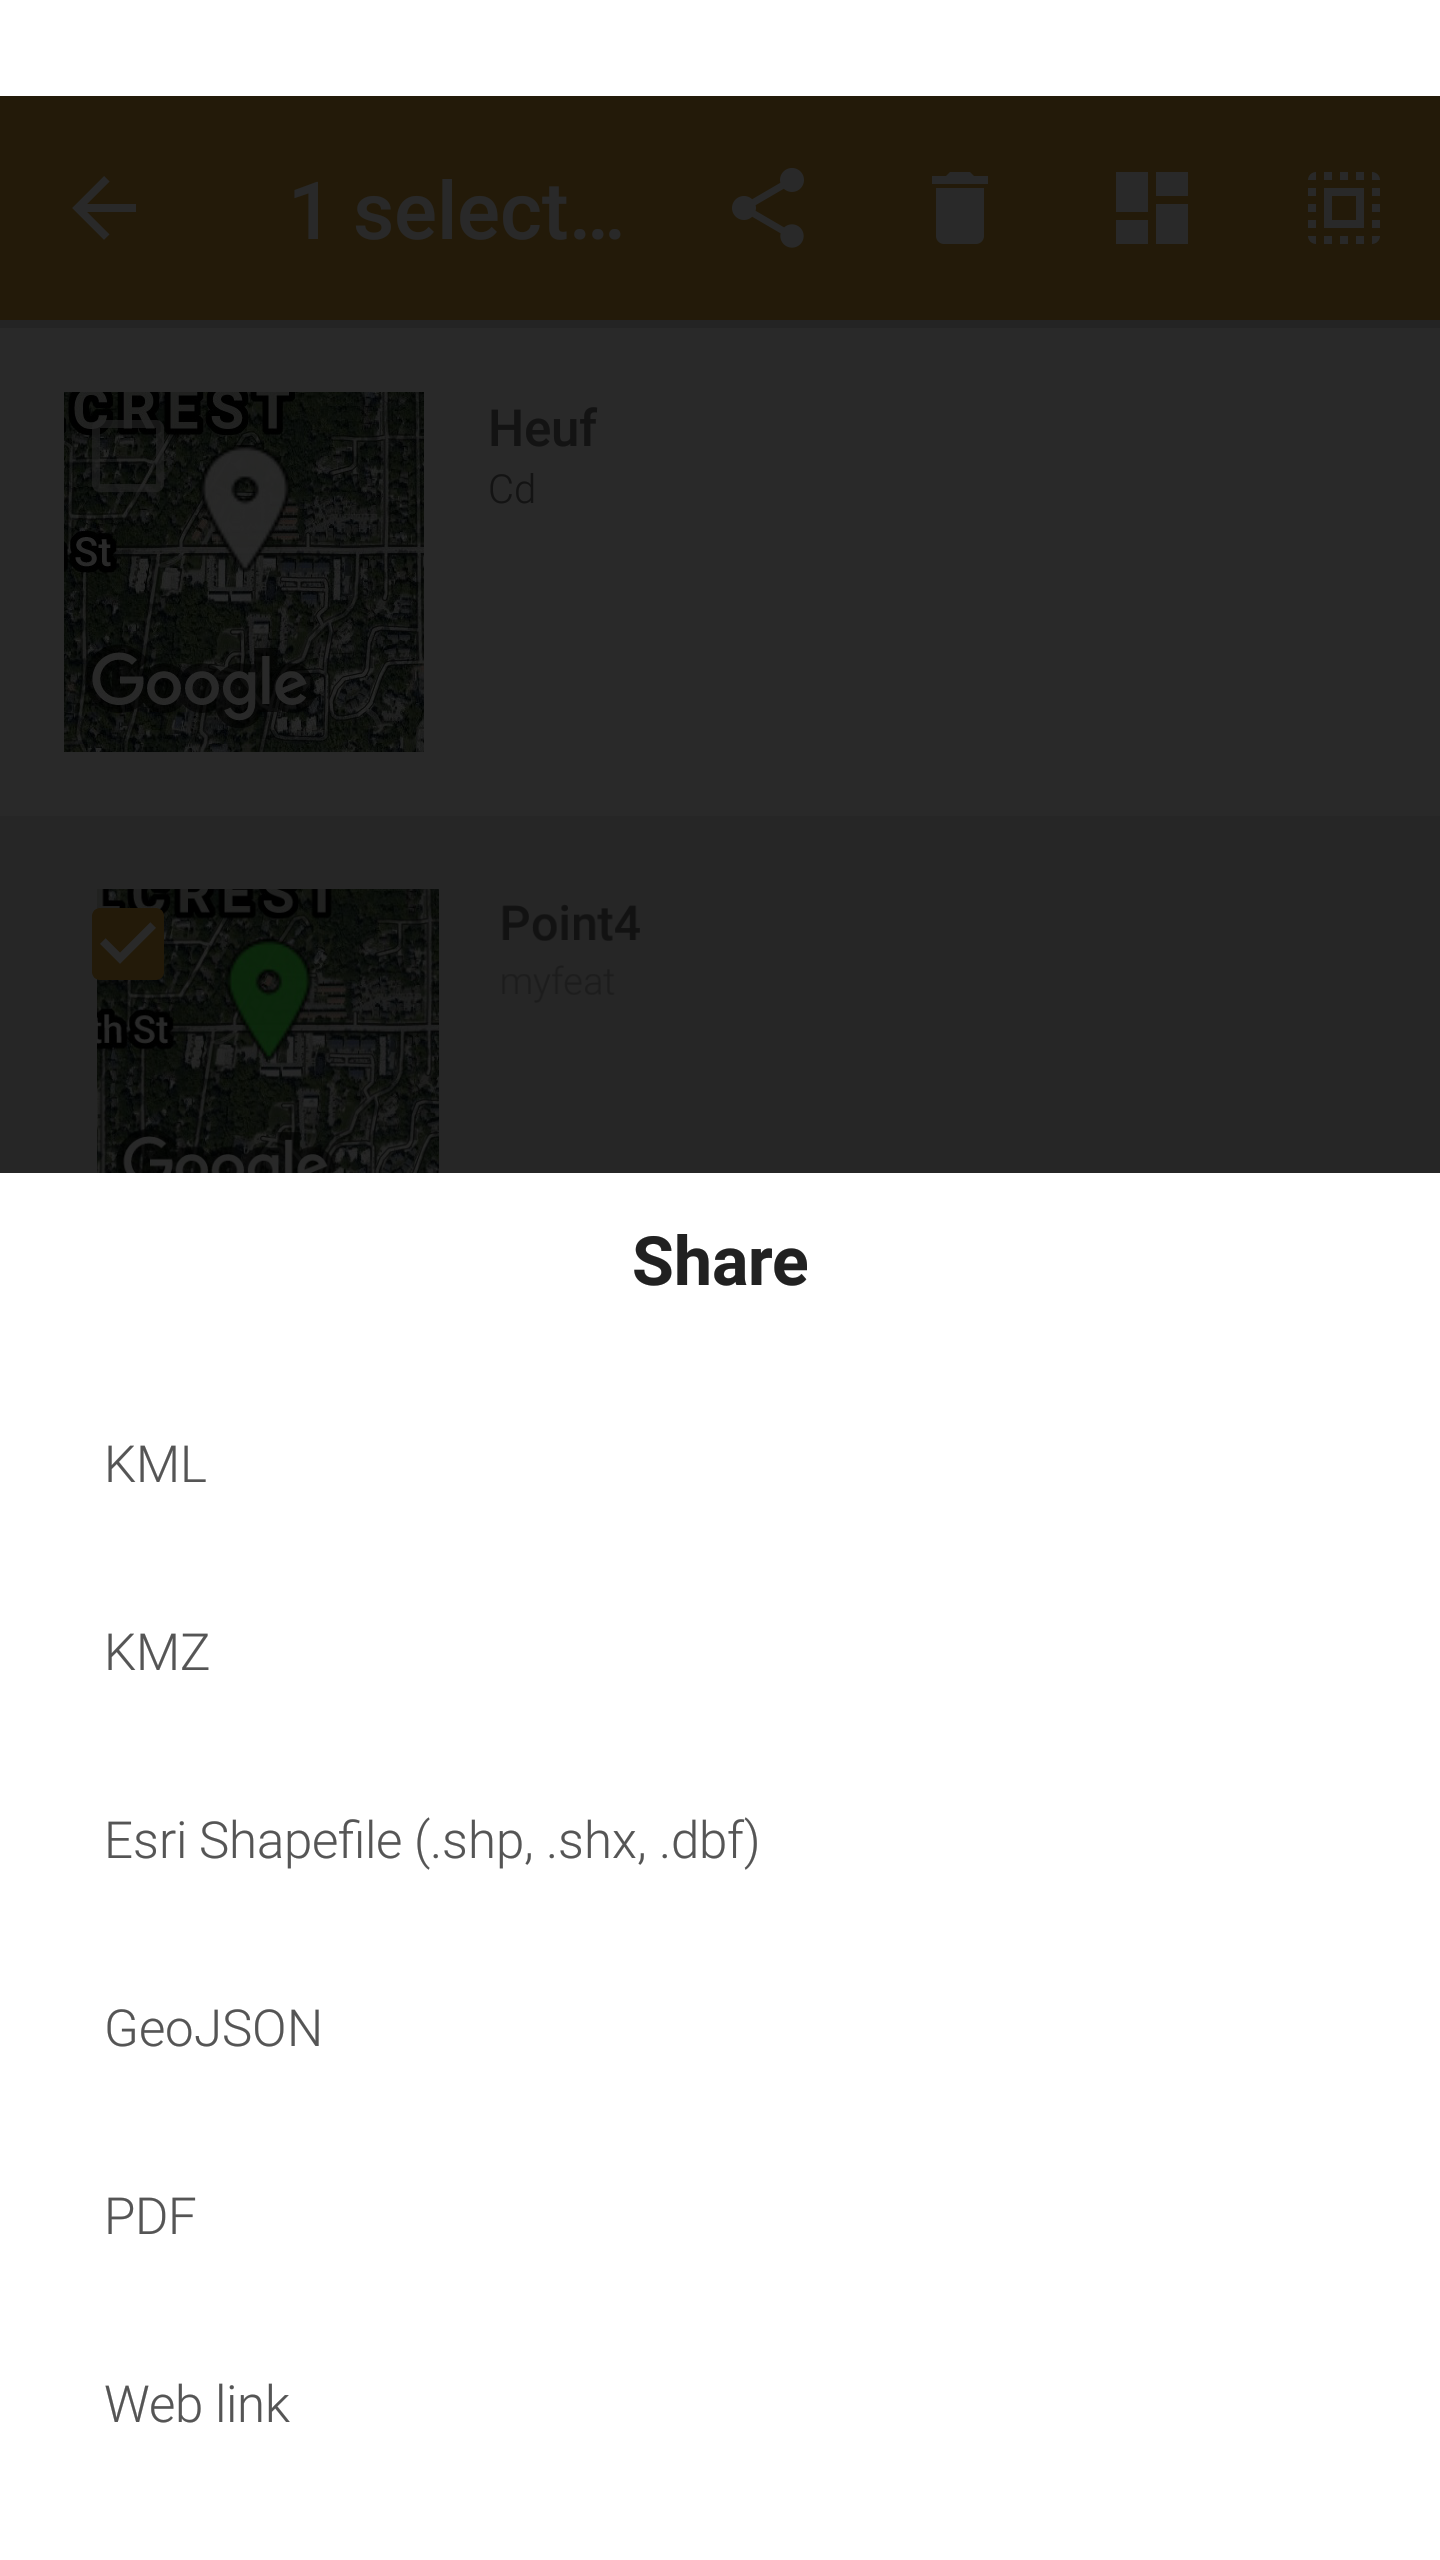
- Click on the Menu button to open the Saved measures.
- Long press on a saved set to open up the options at the top and click the share icon Click on KML and then either save the measure to your device or share with an application you have access to (emailing it to yourself is a common if not long way to do this).
- In Windows Explorer, double-click the file you just created. (If you don’t see it, look for KMZ File under the Type column.)
- Google Earth should open and zoom to the location where your points are. Are your points where they’re supposed to be?
Common errors: “When I open my KML layer adobe pops up.” Adobe can be aggressive with it’s file extensions and may have been set as the default program to handle KML layers as for some reason. You can either right click on the file and open with > find program, or open Google Earth and go to File > Open
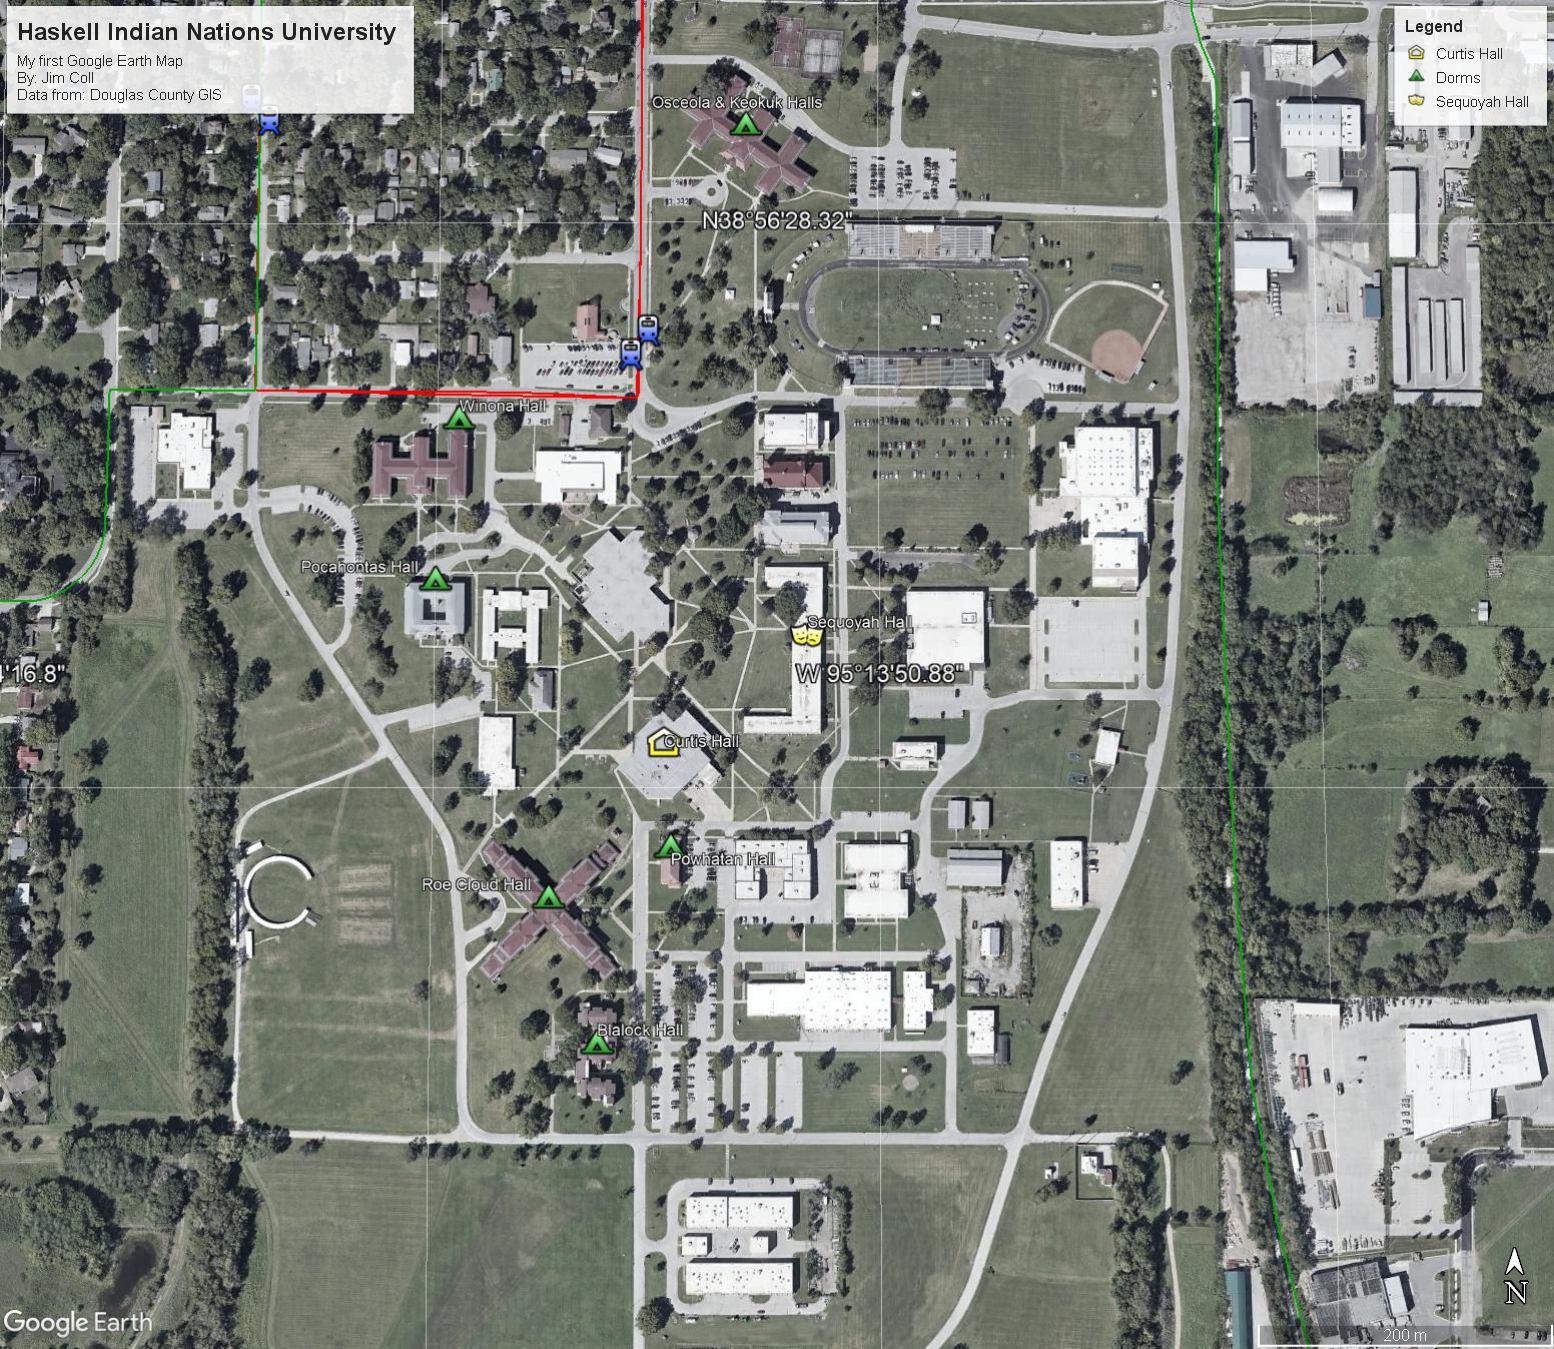
- Find a cool view angle and zoom level that fully encompasses your data.
- Let’s export our map for viewing. Go to File > Save > Save Image… This adds common map elements including Title blocks and Legend, as well as a north arrow. Fill out the pertinent information, including a relevant title, your name, and the data source.
- Finally, under Map Options at the top, you have the option of toning down the intensity of the base map. When done, export your map and submit it. Congratulations, you just made your first map!