Lab 01 - Data survey and database building
The first part of this lab requires writing a survey of the data and mapping technologies in the field that you are interested in (wildlife reserve, conservation, urban planning, forest resources, natural hazards, business, etc.), not limited to the data and mapping technologies covered in the lecture. This survey may include both traditional and new emerging datasets and/or mapping technologies that are used in the fields. The second part of the lab will download imagery and create a database that will be used for the next few labs.
Outline:
Submit the paper outlined in part 1, and the screenshot of the data you downloaded in part 2 to blackboard.
You will write a survey on the data and mapping technologies in a field that you are interested in. The survey should have 2-4 single spaced pages using a font size of 12 points. Reference style should follow one of the GIS journal reference styles (e.g. Transactions in GIS, Cartography and Geographic Information Science, International Journal of Geographic Information Science, The Geographical Journal, and Computers & Geosciences, etc.). I also point you to several resources for reference management software syllabus.
Grading for the survey is based on:
- (80%) Quality of the content: how many potential datasets and mapping methods are included; How you organize your contents. Whether the length of survey is proper, and has a proper level of synthesis and details.
- (20%) Format: follow the requirements described above and check your grammar, spelling and sentence structures before you submit the survey.
One of our goals over the the next couple of labs is to recreate part of the analysis found in Frey et al., 2018, specifically Figure 2 and a lake volume estimation. We will use these data in the next couple of labs and I will not wait for you to download them next week so be prepared to have them ready.
- Some sort of file management system is preferable to nothing. Time wasted looking for files can be better spent performing the analysis, other research, or discovering new music. Here I'll outline what I use, but if you already have a system that works for you feel free to deviate. Just as an aside, avoid file names with spaces, leading numbers, or strange characters.
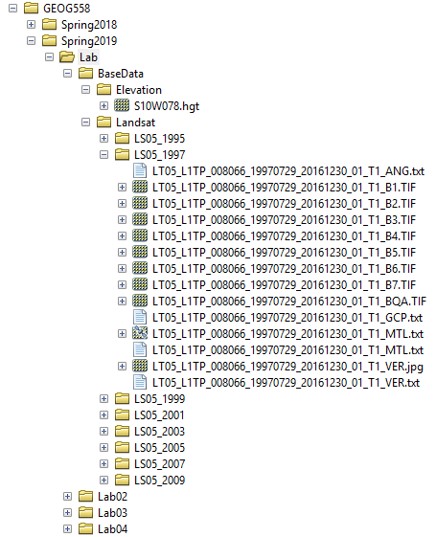
- On OneDrive, create a folder for classes, in that one for this class (GEOG558), and in that folder create one for labs. In that folder create one for Lab01, and one for base data (BaseData). In that create folders, one called Elevation and the other called Landsat. The Landsat tiles can get a little messy so I create extra folders underneath the Landsat folder titled something along the lines of LS05_YYYY.
a visual example of this setup is shown at the bottom of this page.
- We will use USGS Earth Explorer to download the requisite datasets, including Landsat scenes and elevation data. Before we start you'll need accounts at both https://earthexplorer.usgs.gov/ and https://urs.earthdata.nasa.gov/
- Open up Earthexplorer
- We first need to define our area of interest. Under the Search Criteria tab change the coordinate box to decimal degrees, add a coordinate, and copy/paste the following into their respective fields.
- Latitude: -9.397055203542507
- Longitude: -77.38027425750124
- Under the Data Sets tab, search for SRTM3 SRTMGL-1 and make sure the box next to the dataset is checked. Click results and then download the standard format (the HGT, not any of the metadata).
There are a few useful buttons on a results screen. The black footprint shows you the footprint of a tile, and the image icon will draw a jpg over the browser so you can see what the data you’re downloading.
- The elevation data is distributed as a nested zip file. To use it you'll need to unzip it twice to actually use it in a program. Unzip (Right click > 7-Zip > Extract to “FileNameHere”) the SRTMGL folder and move the HGT file (a fancy tif for SRTM data) into your folder structure.
Next we want the Landsat scenes. We’ll simplify this somewhat by starting at 1995 and looking forward in time every 2 year. We’ll also use scenes taken in the winter, so that the lake is stable.
- Under the Data Sets tab, navigate to the Landsat > Landsat Collection 1 Level 1 check [Landsat 4-5 TM C1 Level-1](https://www.usgs.gov/centers/eros/science/usgs-eros-archive-landsat-archives-landsat-4-5-thematic-mapper-tm-level-1-data?qt-science_center_objects=0#qt-science_center_objects).
- Set the Date Range dates to 06/01/1995 and 08/01/1995 respectively.
- Click on Additional Criteria, set the Land Cloud Cover to less than 10%
- Click on Results, when the images load in you can explore them with the “Show Browser Overlay” button, and download the desired tiles (Get the Level-1 GeoTIFF data products.
- Do this for every two years up to 2009 (change the Date Range on the Search Criteria tab). The images I selected for this analysis were:
YEAR SCENE NAME 1995 LT05_L1TP_008067_19950622_20170109_01_T1 1997 LT05_L1TP_008066_19970729_20161230_01_T1 1999 LT05_L1TP_008067_19990601_20161217_01_T1 2001 LT05_L1TP_008067_20010622_20161210_01_T1 2003 LT05_L1TP_008066_20030714_20161205_01_T1 2005 LT05_L1TP_008066_20050703_20161126_01_T1 2007 LT05_L1TP_008067_20070725_20161112_01_T1 2009 LT05_L1TP_008066_20090628_20161024_01_T1 - The Landsat tiles are downloaded with extensions .tar.gz, they’ve also essentially been compressed twice. Unzip them the first time, open them up and unzip them a second time. Copy all the files into their respective folders.
- Open up ArcMap and the ArcCatalog window, connect to the lab folder, and expand the BaseData file tree out a bit. Submit a screenshot of your final files (similar to the one below).
As a reminder, you are submitting the paper written in part 1 and a screenshot of your downloaded landsat scenes.