Installing GIS
Using GIS (or really any skill you are trying to pick up) at least twice a week greatly improves the time to learn, and the easiest way to do so is to have it readily available to you. Here I’ll walk through the ways to install the software for yourself.
Install instructions for:
The ESRI suite of products tends to be a demanding set of programs, so you should have a fairly modern computer if you want to install them for yourself. The ArcGIS system requirements can be found here. I also recommend at least 64 gigs of free hard drive space at minimum. In addition to the hardware requirements, ArcGIS also requires the Windows operating system. Below find installation instructions for different platforms.
The Virtual option is by far the easiest option if you are a recently virtualized member of the KU community. The QGIS virtual option is what I use when I’m not wed to ArcMap.
- To install ArcMap on windows, check the system requirements to make sure your computer has the hardware and software required. You should also close any other open programs or windows.
- Visit https://wwww.esri.com/educationedition to begin the process of activating and downloading your ArcGIS for Desktop Student Trial software.
If you need an authorization code, you can use the free trial ESRI provides by sighing up at https://www.esri.com/en-us/arcgis/trial.
- Create or Log in using your ESRI account as necessary. You will need to use this log in again so remember what you enter here.
- Enter the authorization code and click Activate ArcGIS.
If you received the ArcGIS for Desktop software from your instructor or license administrator, or will be installing from a network server, proceed to step 10.
- Click the button for the ArcGIS for Desktop software version being activated.
- If necessary, download the ArcGIS Uninstall Utility and uninstall previous versions of ArcGIS Desktop or Server. The software cannot be installed on a computer that has a previous version of ArcGIS for Desktop or ArcGIS for Server installed. It’s OK if the computer has ArcGIS Explorer installed.
- If necessary, install the Microsoft .NET Framework (version 3.5 Service Pack 1 or higher). However, if you have a current version of Windows installed it is highly likely this is already installed. If you are unsure if you have the .NetFramework installed, you can download a .net Version detector from http://www.asoft.be/prod_netver.html.
- Determine the location for the ArcGIS for Desktop software you wish to install and click the Download button. You can also download tutorial Data, if desired.
- Double-click ArcGIS_Desktop_10XXXXXXX.exe (Depending on the version you selected, the file extensions may be different) to extract the installation files.
- Locate and run Setup.exe to install ArcGIS for Desktop. The “Complete” installation is recommended.
- After the files are installed, the Authorization Wizard will open and prompt you to choose a product to authorize; select “ArcGIS Desktop Advanced (Single Use)” and click continue.
- The Authorization Wizard will prompt you for an authorization code; enter your activated code. Follow the prompts and the software will authorize and be ready for use. Note: leave the default option for the software extensions selected; they will be authorized automatically.
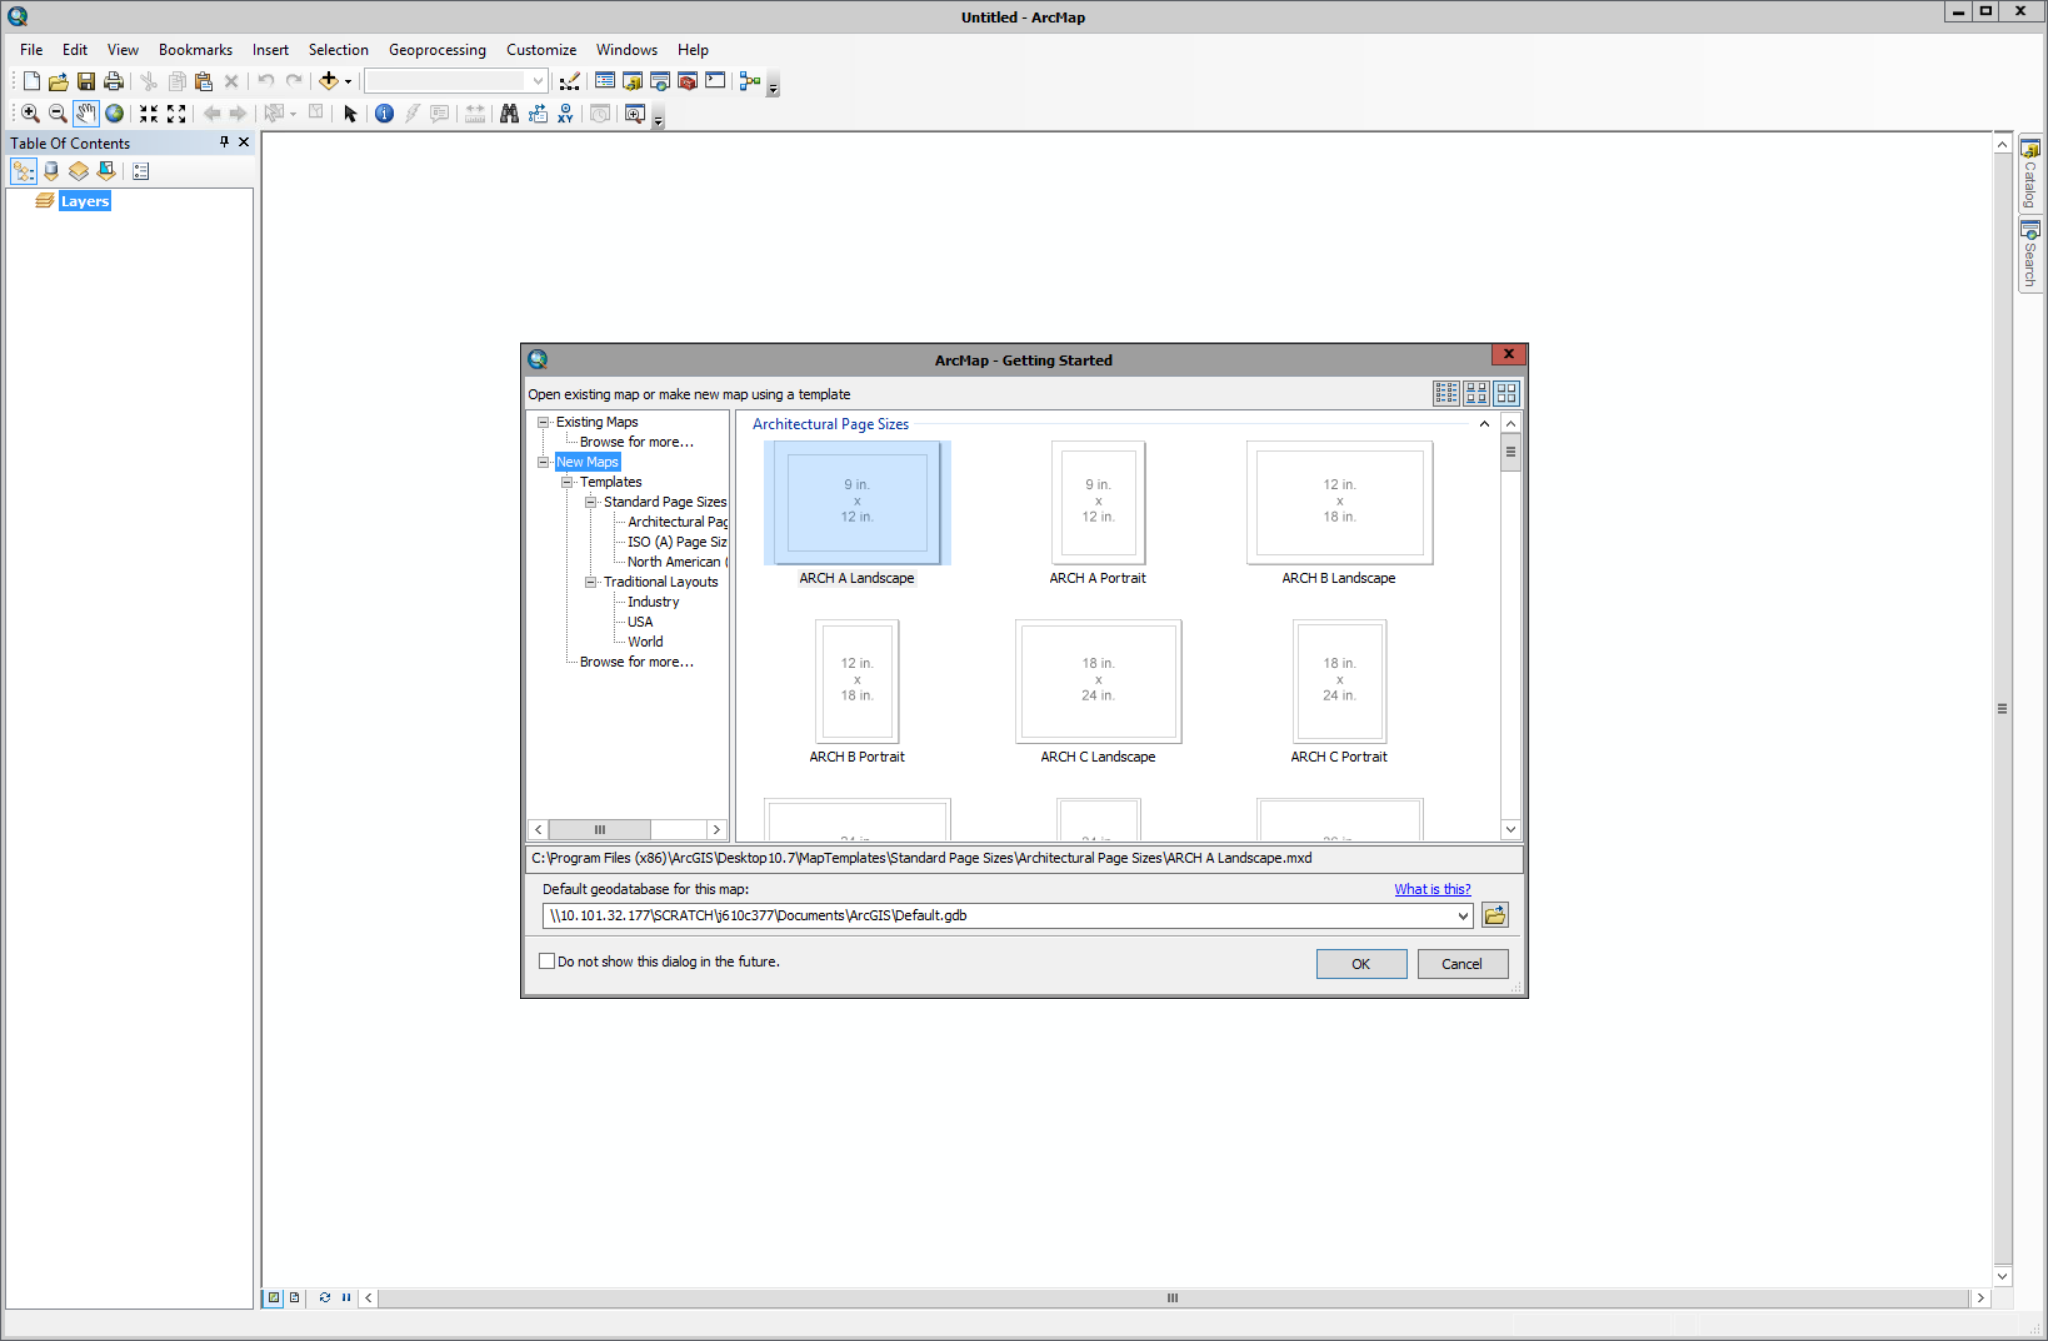
- Finally, restart your computer and try to open ArcMap. If the installation was successful, you should be greeted with the ArcMap template window.
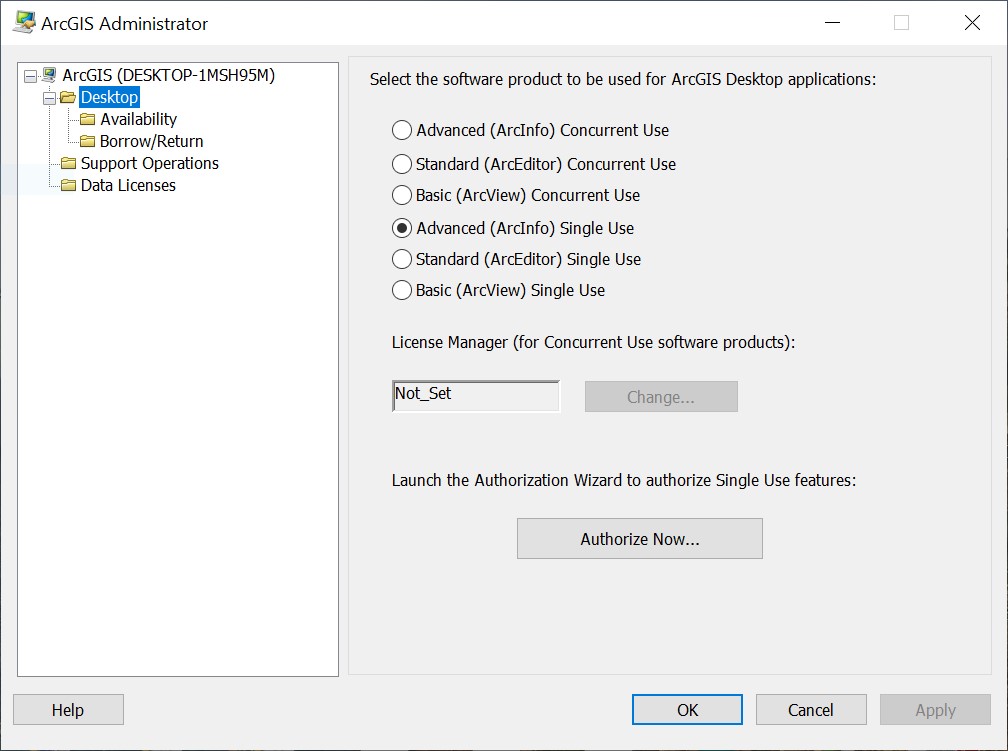
If the installation was unsuccessful, you may need to double check your license authorization. Search for the “ArcGIS Administrator” program which was installed alongside ArcMap, click on Desktop, select the Advanced (ArcInfo) Single Use radio button, and then the Authorize Now… button. Follow the prompts and enter the necessary info.
If you are on a mac os or Linux distribution, there are two ways to install ArcMap. You may use Boot camp to dual boot windows, or you can use a virtualization software to launch a windows installation. In either case you will need a windows key to fully authorize the software. For more information see this ESRI post. Here I will walk you through a virtualization process suitable for either operating system.
- You should start by closing any other programs or windows, and then download VirtualBox here.
- Double click the VirtualBox exe and click through the guided installation.
- Windows provides unlicensed virtual environments for development, available here. Download the VirtualBox version, and unzip it.
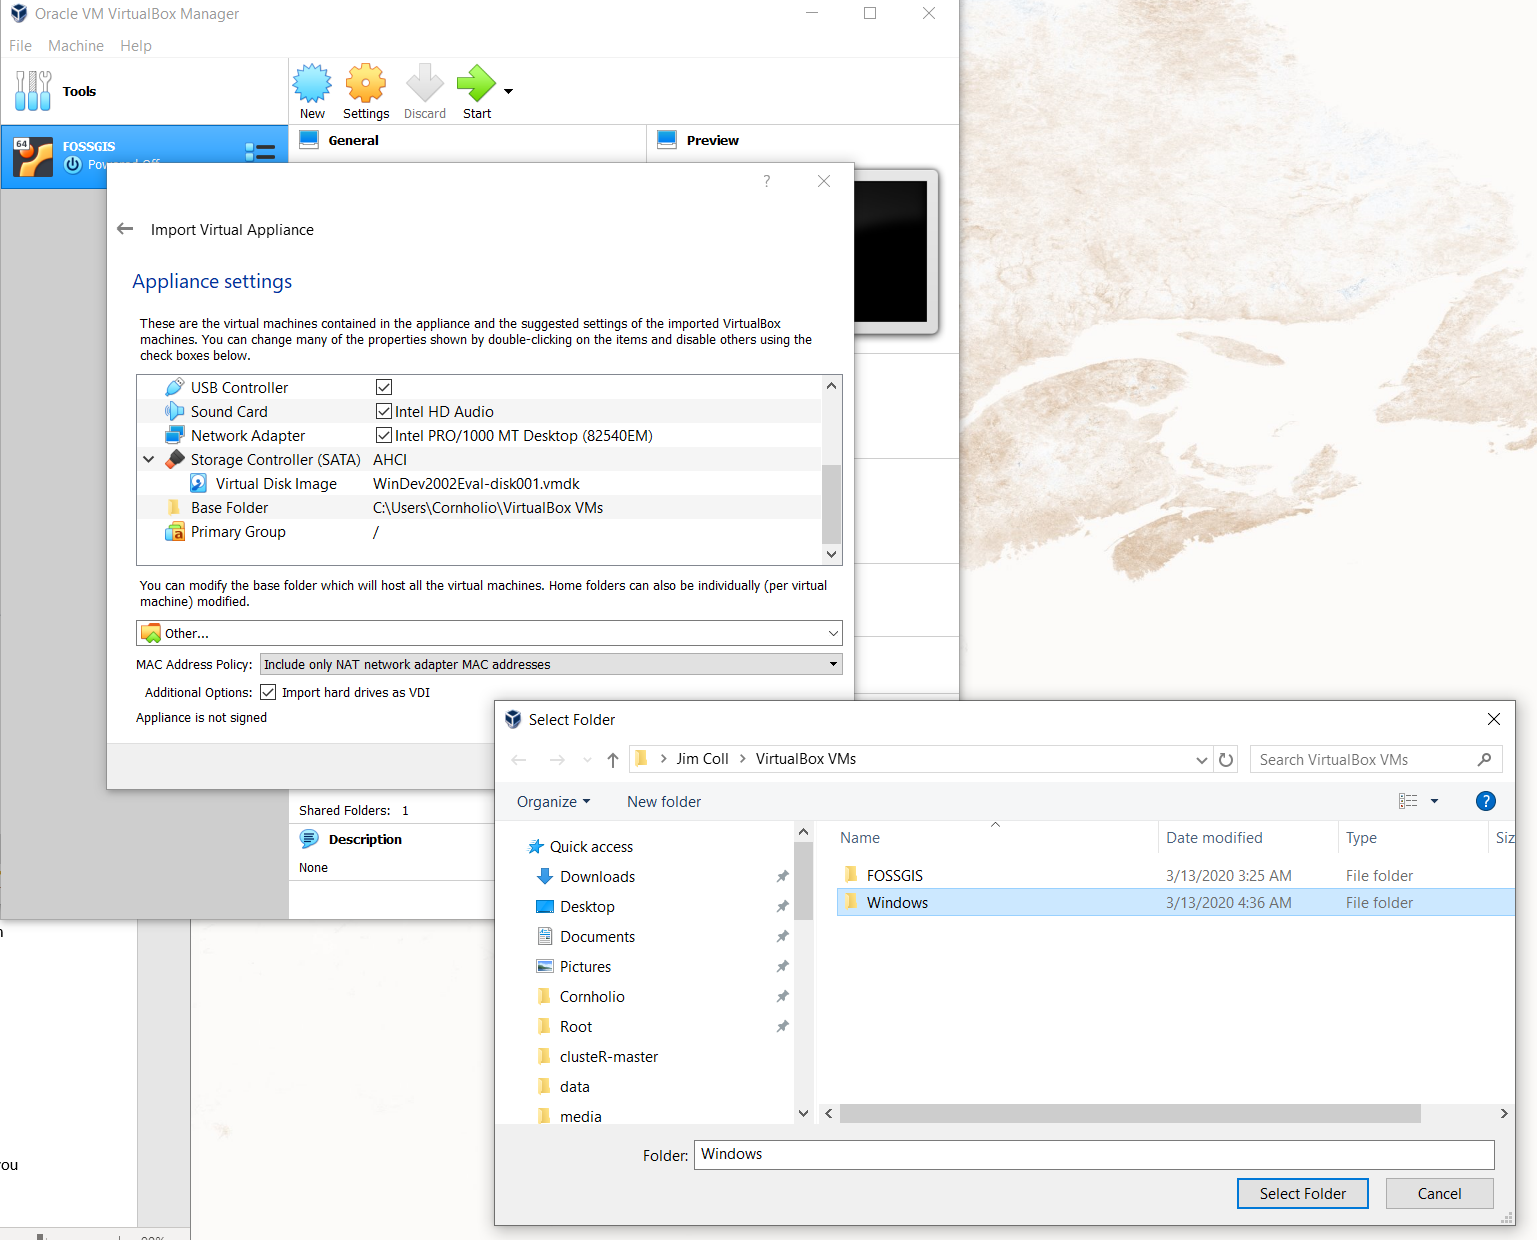
- In Oracle VM, go to File>Import Virtual Appliance and point to the Windows ova. Click next.
- Most of the defaults are fine, but I like to create separate folders of each VM I import. To do this, use the drop down underneath the table to select “other…” and create a new folder called Windows and click on the folder once to select it. Lastly, click Import.
- Finally, lets set up the instance. Right click on the newly added machine and go to settings. Most of the time these are sensible defaults, although there are a few things we can tweak.
- under the System dialog, feel free to increase the Base Memory to a reasonable amount, bearing in mind that the more you allocate to the vm, the less you have available on the host. Feel free to explore the other options but don’t change them unless you know what you’re doing or can handle a crash or two :)
- Under Shared Folders, create a new folder (the icon with a plus)
- Point to a shared folder on your host machine (mine is called “hold” here)
- Select the Auto-mount option
- Change the Mount point to something sensible (like \share)

- To launch Windows, click the imported Windows appliance and click start. You may close the Auto-capture alerts.
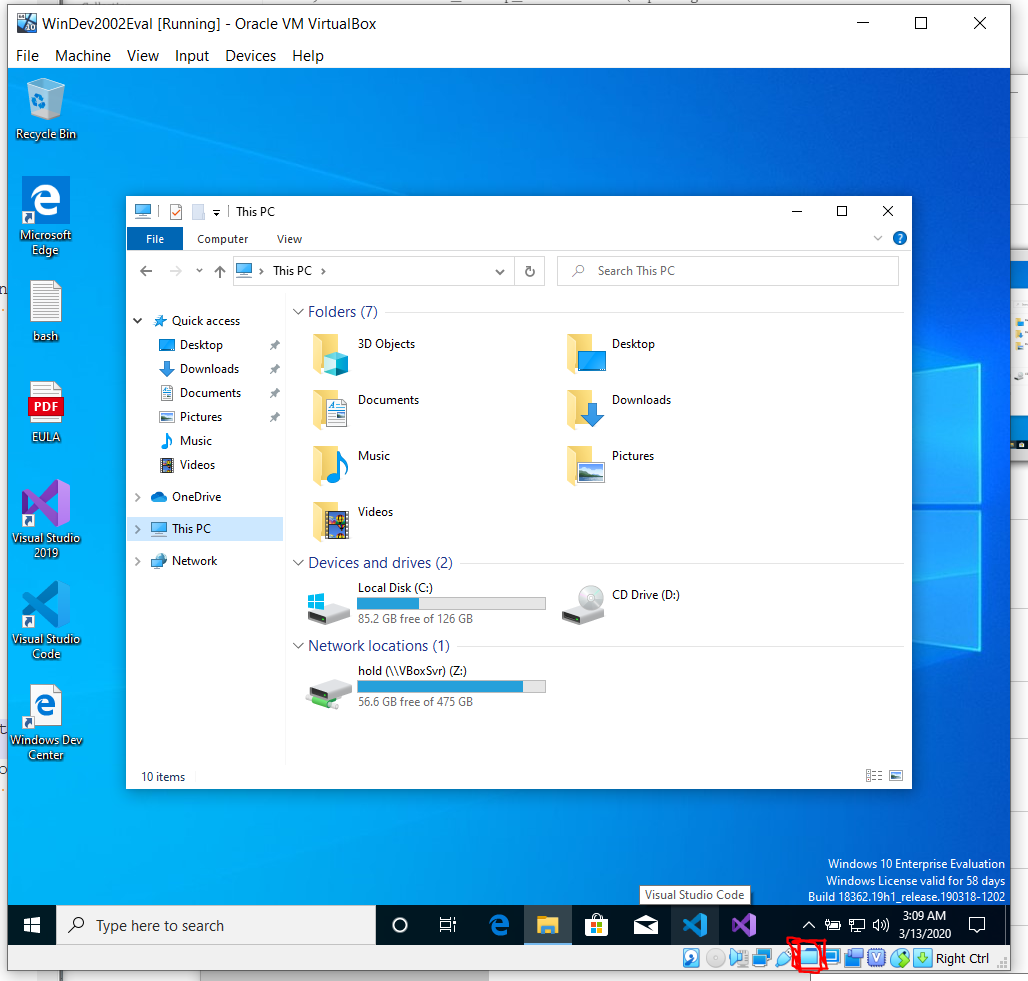
- To connect your folder simply navigate to This PC in the windows explorer and click on the share folder button on the VirtualBox window as needed to make the folder appear.
Now that you have a version of Windows installed, you can follow the instructions under the Windows tab.
A last note: As you may have noticed, when you downloaded the VM image, there was an expiration date ~60 days from the date you downloaded it. You will either need to activate this version of windows, or delete and reinstall as needed.
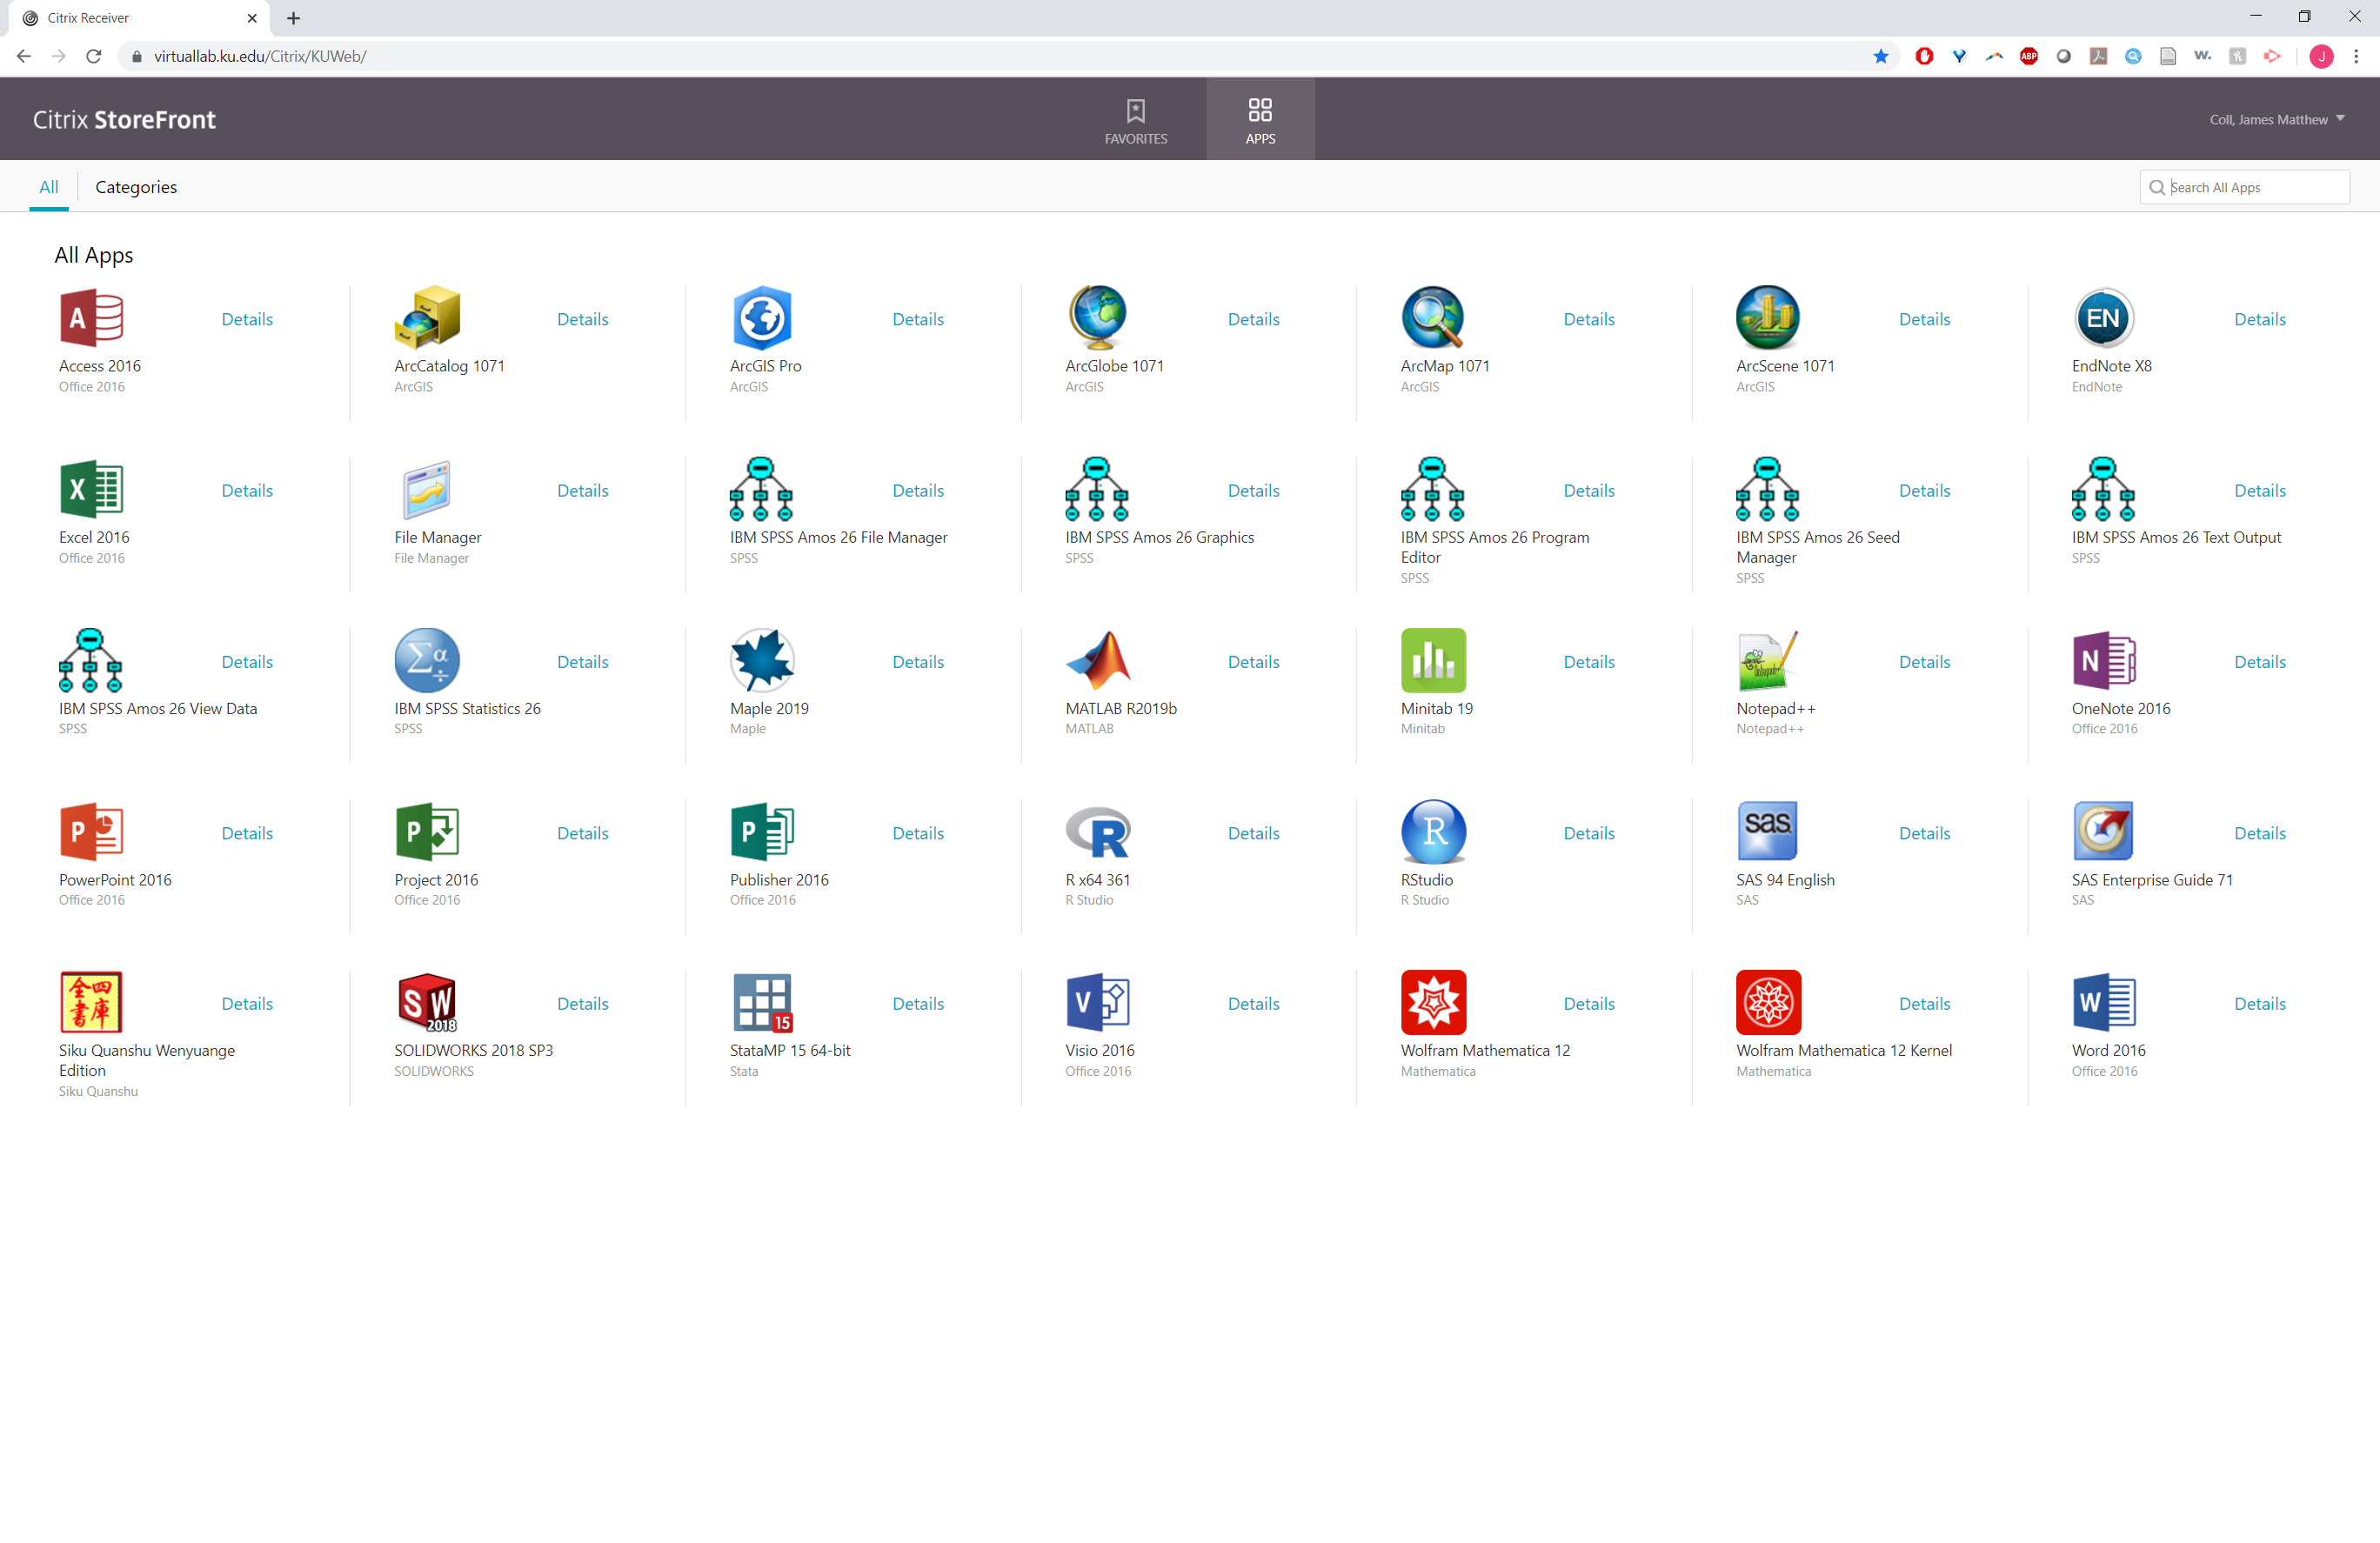
If you are a student at KU, IT offers virtualLabs, a remote desktop program you can use to access ArcMap. In order to access VirtualLabs you will need to install Citrix Workspace. Because ArcMap is running on a remote PC, the system requirements are far lower and largely related to browser compatibility. To install this, you should:
- Login to Virtual Lab using your KU Online ID and password.
- You will be prompted to download and install the “Citrix Receiver” application.
- Follow the installation instructions, including restarting your computer.
- and finally, re-log into https://virtuallab.ku.edu/vpn/index.html. You should see the storefront, where you can select ArcMap, which will launch through your browser.
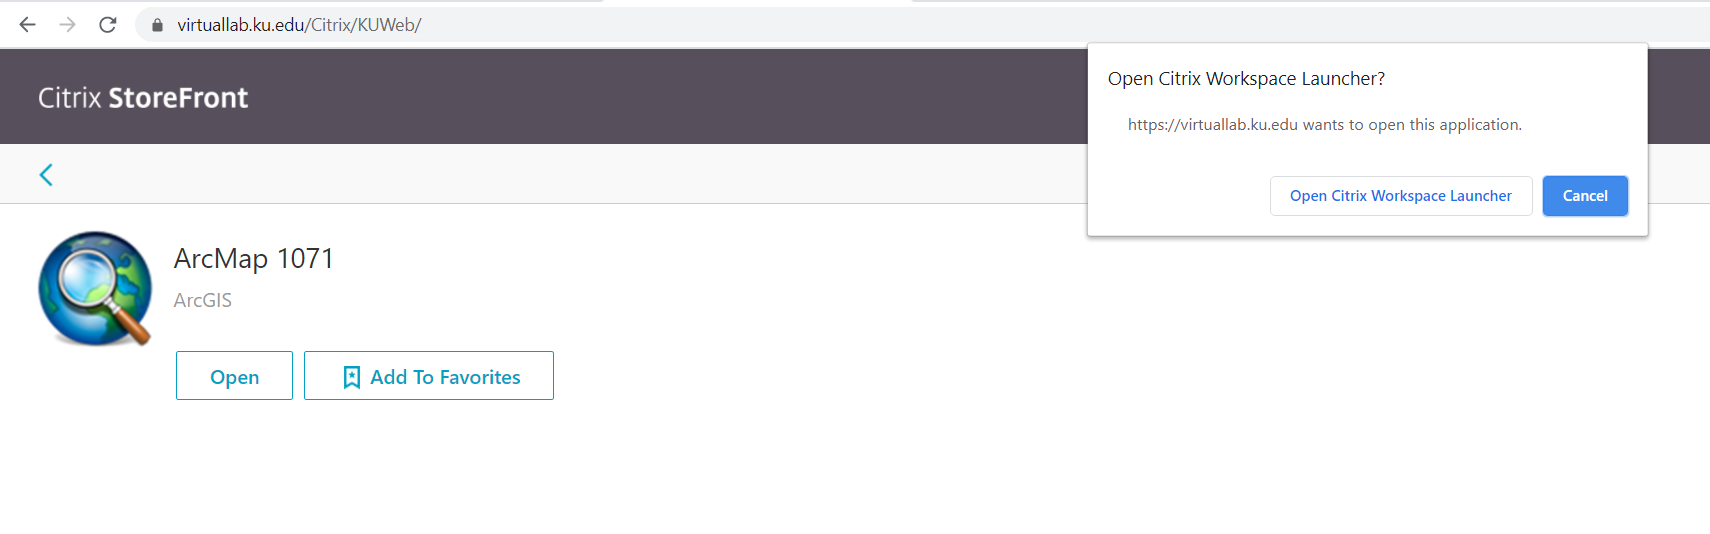
- Click the Open Citrix Workspace Launcher.
- Finally, in order to transfer data you need to “Permit all access”, a prompt you can make appear when you attempt to connect to a folder.
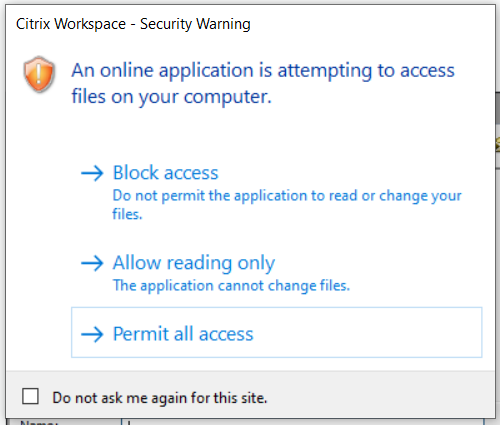
At no point did I have to log in via the actual citrix app. Feel free to close the prompt that looks like so:

If you need more detailed instructions, you can find those here. Finally, as per the instructions…
When working in Virtual Lab, you must save files to your computer or mobile device. Virtual Lab does not provide storage space. Files edited with Virtual Lab applications are not backed up by KU and cannot be restored by KU if something happens to them.
NOTE: After one hour of idle time, Virtual Lab will disconnect and any unsaved work will be lost. It is important to save files to your personal device before you disconnect from Virtual Lab.
Finally, a few tips picked up along the way:
- File pathing is especially important when using this service. I would consider it best practice to make sure that you are saving all outputs to your local computer. These paths should always start with \client... This is your local pc, so use your folder structure.
- I’ve found connecting to OneDrive to work some of the time, but be aware that you are going through three different api’s just to load a file. When in doubt, one of the first things I cross off my troubleshooting list is to place the files on my local disk.
- You will have to be exceptionally patient, this is by far one of the slowest ways I’ve ever used GIS.

“QGIS is a user friendly Open Source Geographic Information System (GIS) licensed under the GNU General Public License. QGIS is an official project of the Open Source Geospatial Foundation (OSGeo). It runs on Linux, Unix, Mac OSX, Windows and Android and supports numerous vector, raster, and database formats and functionalities.” When I first encountered QGIS many moons ago, it used to be a cumbersome, difficult tool to use compared to ArcMap. However, in just a few short years QGIS has made massive improvements and can even stand toe to toe with ESRI in many respects, and is free and open source. Additionally, it can be even easer to install than ArcMap, and if you go with the virtual installation route provided by OSGeo below you will have a platform agnostic installation of many of the GIS tools and programs that you could ever need (Python, R, PostGIS, GRASS, GDAL ect.) As such, I hearty recommend the virtual option. Regardless of the version chosen system requirements are minimal (1 GB RAM (2 GB are better for trying Java based applications), 1GHz i386 or amd64 compatible CPU) and most modern computers will meet your needs.
See the OSGeo quickstart docs for a more verbose but slightly outdated set of instructions should this set of steps not do it for you.
- You should start by closing any other programs or windows, and then download VirtualBox here.
- Double click the VirtualBox exe and click through the guided installation.
- Download and unzip the latest version of OSGeoLive, you probably want the .amd64.vmdk.7z version. Save that unzipped folder in your VirtualBox VMs folder.
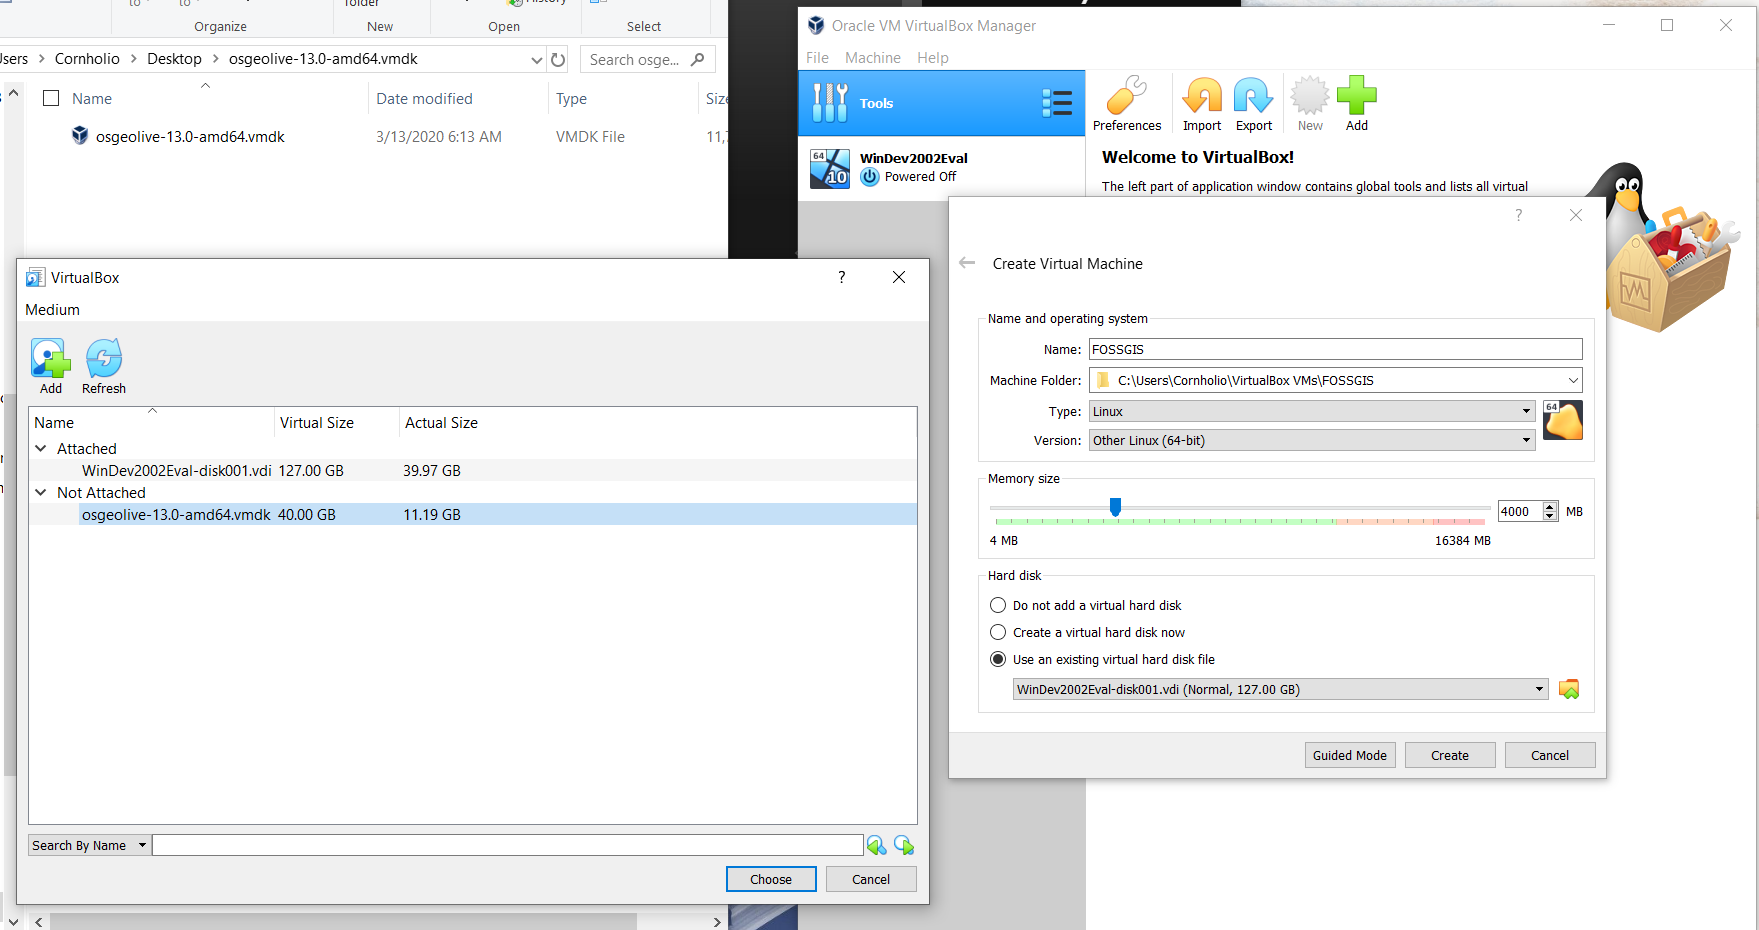
- In Oracle VM, Click on Tools, New.
- Name your new machine (I call mine FOSSGIS).
- You can leave the Machine Folder dialog on VirtualBox VMs.
- Change your Type to Linux and your Version to Ubuntu.
- You will most certainly want to increase your memory (ram) beyond the half gig default.
- Select the “Use an existing virtual hard drive disk file” and point to the vmdk file. Finally, click Create.
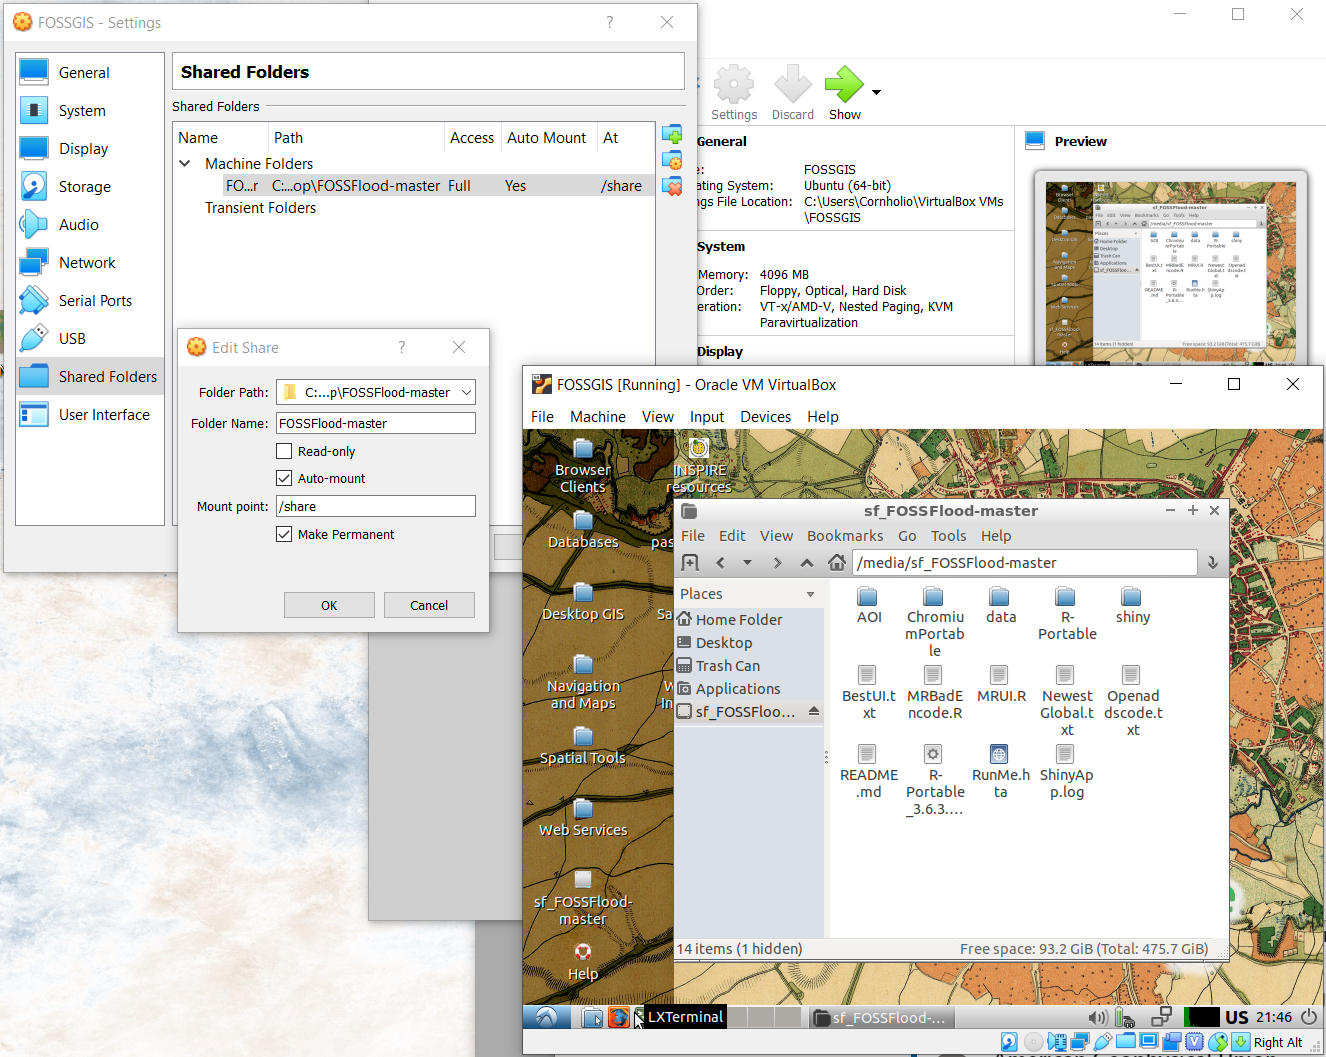
- Finally, lets set share a folder. Right click on the newly added machine and go to settings.
- Under Shared Folders, create a new folder (the icon with a plus)
- Point to a shared folder on your host machine (mine is called “FOSSFlood-master” here)
- Select the Auto-mount option
- The shared folder is now connected!
If you’re on a smaller keyboard you likely don’t have a right-ctrl key, change the host bind key to something else (I use right alt. File > Preferences > Input)
- While the above steps will serve you through the intro and intermediate classes, I also use this method almost exclusively for my python needs. Python can be a wonderful tool, but installation and update woes, along with less flexible graphical execution options means it often loses out to R when new geospatial programmers are looking for their first launch point. With this linux (ubuntu) installation, we bypass virtually all these issues (see note below). However, to get the most out of this way of accessing python, we need to set up a few things. Therefore, after setting up your virtual machine for the first time, I suggest you open up a terminal and run the following:
sudo apt-get update -y				# updates all sorts of goodies
sudo apt install snapd				# Installs snapd, used to install programs
sudo snap install --classic notepadqq		# Installs a better text editor (almost notepad++)
sudo apt install python3-pip			# Installs pip3 for python
sudo apt-get install proj-bin			# Installs and updates proj library
pip3 install pysimplegui			# Adds gui library for python scripts!
pip3 install seaborn --upgrade			# My favorite python plotting library, because matpltlib syntax is disgusting
pip3 install jupyterlab				# for notebook support

# Only run if you want to get geopandas to run
pip3 install setuptools==39.0.1
pip3 install pyproj==2.6.1
pip3 install pandas==0.23.3
pip3 install geopandas==0.5.1
When I say all, I mean all but the arcpy library :/ ESRI provides a tiny bit of help in this direction, but it seems as though their objective is to force you into the always on licensing of the new millennium. For what it’s worth, I don’t think I’ve encountered anything written in arcpy that wasn’t more straightforward to implement yourself, but of course your mileage will vary.